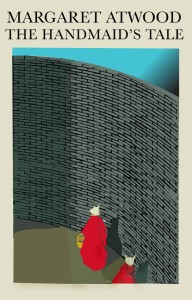
Course / Level: Vector Art / Sophomore
Project Goal: The goal of this project is to encourage students, as visual designers and graphic artists, to explore and express their understanding of the freedom of speech as it relates to the printed form, while demonstrating competency in vector art and illustration skills. It is also encourages students to read books that may or may not have been made available to them.
Learning Outcomes: Students will skillfully demonstrate an understanding of beginning and intermediate vector skills. Students will demonstrate professional work practices, creative problem solving techniques, and critical thinking skills through research, documentation and presentation of the project topic. Students will gain experience assessing and discussing their work and the work of their peers in critique format.
Problem: Research and re-create a published book cover design, preferably one you have yet to read. The chosen book must have been banned or censored in some way, at some point in time. Base your design on the published book cover, but modify it to reflect your interpretation of the book and your own graphic style.
Technical Skills: Basic shapes, stroke, fill, gradients, Bezier Pen tool, type, and use of layers and template file to create a well-organized document. Translation of scanned image or drawing into vector-based illustration using minimal points and well-crafted lines and curves.
Student Work
- Student Work: I. Hou
- Student Work: K. Jabeen
- Student Work: S.Williams
- Student Work: D. Martin
Procedure:
STEP ONE: Research and Documentation
Using the references below begin your research on the phenomenon of banning books historically and in contemporary American Society. See if you can find which popular book was banned most recently. In your sketchbook, document and organize your research.
- Book Cover Design:
- Covers is dedicated to the appreciation of book cover design.
- Banned book lists:
- Online Reading: public-domain literature
- American Library Association:
Choose a book you would like to read from one of the banned book lists above. You will be presenting an analysis of the book to the class, so pick something you like and can finish in the next few weeks.
Find the book cover of your choice by going to the library, bookstore or your book shelf. We will visit the College Library next week.
STEP TWO: Template Setup
- Scan the book cover at 150dpi– high enough that you can use the scan as a base for your illustration.
- In Photoshop, if necessary, increase the contrast, Posterize, add poster edges filter or cut-out filter to create a graphic tracing image with strong outlines.
- Resize the scan so it is approximately 1650 x 2550px. NOTE: make sure constrain proportions is checked. You may need to adjust your illustration to fit this standard size.
STEP THREE: Specifications and Execution
- Create a folder on the desktop called midterm project and place your scanned, resized and modified bookcover image in the folder.
- Setting up your Illustrator file.
- Size: 5.5 x 8.5 (1650 x 2550px)
- CMYK
- Next “place” (File > Place) the modified bookcover image as a template layer in Illustrator. Choose the template and link check boxes and click ok.
- Use named layers to organize different elements in your illustration, for example: background, subject, type.
- You can use the Eyedropper + Shift to select colors from your bitmap image or create your own colors in the color palette. Remember to save and label your color swatches.
- Use the Bezier Pen Tool to outline the outer edges of each part of your illustration. You will toggle between OUTLINE and PREVIEW mode in order to achieve accurate curves.
- Use the Type tool to recreate the book title and author text, but you must choose an appropriate font. Set up tracking and leading before turning fonts into outlines. Once in outlines, you may adjust the look and feel of the font, but not to the point that the type become illegible.
- In Outline mode begin tracing the mid-tones, shadows and highlights that define the structure of each element in the illustration. Create broad closed paths to start, then add detail when the main areas have been defined. Create nested layers to organize different elements in your illustration, if your graphics are quite complicated.
- Apply your saved color swatches to the different parts of your illustration, hiding and unhiding layers when necessary. Toggle between Outline and Preview to see your progress.
- When you are finished, zoom into your illustration and clean up any stray paths, unnecessary or redundant anchor points.
STEP FOUR: Submission
Prepare your summary:
Write a one page, double spaced summary/analysis of your banned book. Include why the book was subject to censorship or challenged in some way. Please review why our right to read is guaranteed in the First Amendment to the Constitution of the United States. Make sure you address these questions:
- What is Intellectual Freedom?
- What does the First Amendment say and how is the basic right to read protected?
Prepare your finished files as follows:
- Name your files with your name and the project title.
- jsmith_midterm.ai
- jsmith_booksummary.rtf
- Put all files (illustrator, scanned template, fonts and summary) in a folder with your first initial, last name.
- Drop the folder in the ad360_DropBox on the ADGA server (10.10.110.16)
- Create a backup on CD to turn in.


