Category Archives: Lecture

COMD Class 9 | Pattern Mashups

October 5, 2015

What’s needed for this class?

  1. Post your Phase 1 of Project #2 writing to the class blog.
  2. Complete Staccato / Legato Pattern Mashup PREP
  3. Post an image or image gallery of your Humument pages.
    • Post title: Humument #1
    • Category: Humument
    • Tags (some or all, depending on your compositions): Organic Shape, Geometric Shape, Frame, Figure-Ground, Obvious, Ambiguous, Positive Space, Negative Space, Unity, Economy
  4. Materials Needed: Sketchbook with and variety of pencils — plus inking pens, 9×12″ bristol.

Critique

  • Present your refined Staccato / Legato Pattern drawings.
  • When critiquing your colleagues’ work, remember to identify which patterns are successful AND WHY THEY ARE SUCCESSFUL and which patterns are not successful AND WHY THEY ARE NOT SUCCESSFUL.
  • The goal is to help your colleagues successfully realize this part of the project and “solve” the design problems presented.
  • Try to use of the vocabulary: Line, Rhythm, Repetition, Monotony, Variety, Pattern, Organic, Geometric and Movement

Lecture

  • Review Elements and Principles
  • Discuss examples of Repetition in web design from Design Meltdown
  • How are pattern and rhythm used?
    • Regular pattern repeats elements in timed or predictable intervals.
    • Progressive pattern repeats elements, but changes in size or color to create progressive steps.
    • Flowing patterns are organic or natural feeling patterns that create movement

Lab

Pattern Mashup Work

Once you have created a total of 6 strong patterns (3 Staccato and 3 Legato) move on to the next step. Refer to class pattern examples for ideas.

Goal:

  • On 9×11″ Bristol create 1 final inked composition using 1-2 Staccato and 1-2 Legato pattern squares. The finished composition will be a field of pattern squares of varying scale (big, medium, small), orientation (horizontal, vertical, reflected, rotated) and should demonstrate an obvious rhythm by uniting the patterns representing Staccato and Legato, like a DJ mixing parts of different songs.
  • Even though the composition will be a field of pattern, it should feel unified.

Process:

  • Design a grid to act as an invisible or visible structure to support the elements of your composition (the staccato and legato pattern squares).
  • Create at least 3 possible layouts in your sketchbook.
  • Explore how you will arrange your pattern squares within the grid to create a unified composition.
  • Questions to ask:
    • How will my different staccato and legato patterns relate to each other?
    • When the patterns meet/touch will they complement each other, blend together, or repel each other?
    • What will the overall composition “sound” like?
  • Some squares should be larger, some should be smaller, all should repeat at least twice.
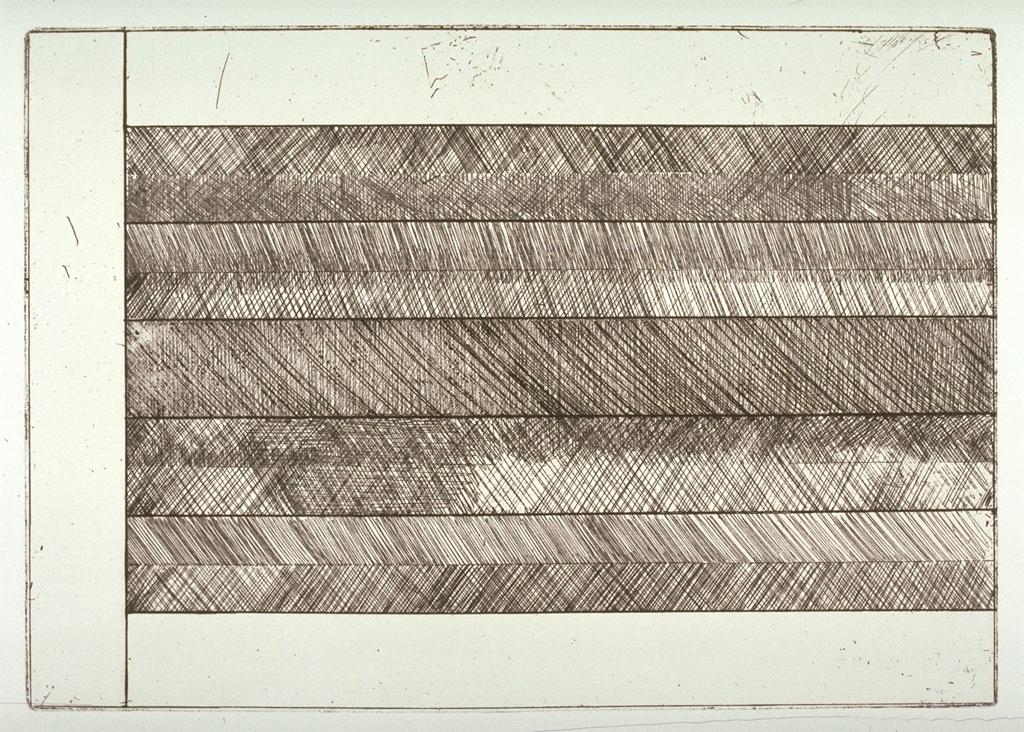
  • Here is an example of a grid used by a student. Notice how the squares of the grid vary in size and placement on the page. The relationship between the squares on the grid should contribute to the overall rhythm and unity of the composition.
    grid structure example

    Grid Structure Overlay

    daniel mashup example

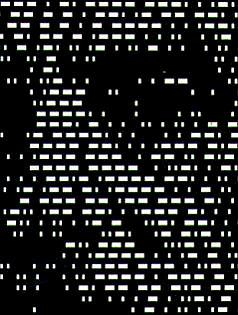
    Daniel’s Final Pattern Mashup

Project Research:

  • Explore this project :: Seaquence  :: to experiment with mixing audio rhythms. Imagine how you can replicate this experience visually using the Staccato and Legato pattern squares you’ve created.
  • Another place for pattern inspiration might be a search for “quilts” or “crazy quilts” or textile design.
  • Explore how other students have realized the Pattern Mashup project:

Before the end of class:

  • Make at least 3 sketches (or collages) in your sketchbook to explore how you will arrange your final inked Pattern Mashup. These are NOT thumbnails, these are preparatory drawings that you will use to complete your final inked compositions.
  • Ask the Professor to review your work. If the work is approved, you may begin work on your final inked Mashup on 9″x12″ bristol board.

Homework

  1. DUE: Final inked version of your Pattern Mashup on a piece of 9″x12″ bristol board, based on your finalized preparatory compositions. Come prepared to present your work!
  2. Post to the blog.
    • Create a new blog post called Sound Visualizations: Phase 2.
    • Take photos of your finished Inked Pattern Mashup and add them to the post (make sure it is well-lit and in focus.)
    • Include the hours that you worked on this part of the project.
    • Don’t forget to comment on at least 3 other student’s posts.
  3. Materials needed: Flash/jump drive.
  4. Contact me with questions.

Print this page Download PDF

COMD Class 7 & 8 | Line, Rhythm & Pattern

September 30, 2015

Materials Need for This Class:

  • Sketchbook
  • Pencils (wide range from 4h to 4B)
  • A song or piece of music that you like

Discussion (15 min)

The Elements: basic components used as part of any composition, independent of the medium.

  1. Line: An series of points, which has length and direction. It can be the connection between two points, the space between shapes, or the path of a moving point. A closed line creates a shape.

The Principles: basic assumptions that guide the design practice.

  1. Rhythm: Is a repeated pattern, such as what we hear in music. In different art forms, it can be a very complex interrelationship or a regular, steady beat.
    1. Repetition: Repeating a sequence; occurring more than a few times. In design, repetition can create visual consistency and a sense of unity.
    2. Pattern: Unbroken repetition, the repeating of an line, object or symbol.
    3. Variety: Visual rhythm is often punctuated with variations or changes in color, texture, or form. Creating variety is easy. Too much variety can lead to chaos and confusion for the viewer. A designer must effectively use pace and spacing to create rhythm and achieve unity in a composition.
    4. Monotony: Without variety or change, excessive repetition can lead to boredom and uninteresting compositions.

References:

Lab 1: Project #2 | Sound Visualizations

Line Networks : Monotony and Variety

Create two types of pencil drawings in your sketchbook.

The first drawing will demonstrate a lack of variety or monotony by visualizing a piece of music with very little variety and contrast. The second drawing will visualize a song or series of songs that have variety and obvious changes in meter, pitch, and volume. Both drawings will use a network of repeated horizontal, vertical, and diagonal lines to demonstrate visual pattern, repetition and rhythm. If the music ends before your drawing is finished — REPEAT.

Monotony Line Network (LISTEN MP3): 

  • To begin this drawing, simply create a freehand line from top edge of the page to bottom or in whatever direction you “hear”.
  • Continue creating the “vibrations” of this line until the entire page is filled with lines eminating off of this original line. Once you get to the edge of the paper, turn the paper 90 degrees and create a grid– drawing intersecting lines across the same page.
  • Working slowly, with intention, try to keep your lines consistent, close together, and evenly spaced (this is hard– nearly impossible, actually). Create several versions of this drawing in your sketchbook, using one type of pencil for the whole drawing- perhaps a soft pencil (2B or 4B).
  • Your final drawing should look like a grid, woven fabric, or network of lines.

Variety Line Network (LISTEN MP3)

  • As soon as you hear the music, consider the sound you hear and visualize it as a line.
  • Choose a pencil (hard or soft) and start drawing lines– don’t draw anything recognizable.
  • Let your pencil move in one direction, until you hear the sound change. At that moment, change the direction/angle/length/weight of your line.
  • Notice how easy it is to create variety and how quickly your drawing become cluttered, chaotic, and confused. Let this happen.
  • Create several versions of this drawing in your sketchbook, using a variety of line weights and styles (thick, thin, medium, short, long, broken). Choose to make a mark based what you “hear”.  For example, if you hear a low tone, perhaps your marks should become thicker, denser or darker.
  • In some parts of your drawing you may make lines so dense that groups of lines become solid shapes. In other areas, your lines may be light, thin, and sparse.
  • Take the entire page into consideration– observing figure/ground, unity, and economy, even if these principles are lacking.

In your sketchbook you should complete at least:

  • 2 Monotony Line Networks
  • 2 Variety Line Networks

Lab 2

Staccato / Legato Pattern Mashup PREP

  • Take out a soft pencil #3B and your sketchbook.
  • Rhythmic Line Test 1: Listen to this song: Another One Bites the Dust and draw a line representing its rhythm across your first sheet of paper. Repeat and refine until you get a variety of interesting lines. How would you describe these lines?
  • Rhythmic Line Test 2: Listen to this song: Summertime and draw a line representing its rhythm across your second sheet paper.Repeat and refine until you get a variety of interesting lines. How would you describe these lines?
  • Patterns: Now create at least 12 thumbnails: 6 for Staccato and 6 for Legato. Using your rhythmic line tests as a guide, create 6 patterns that represents STACCATO and 6 patterns that represents LEGATO.  Continue to refine these patterns. Try varying the line weight (thick and thin) and the spacing (tight and wide) between the lines. Let the rhythm of the music dictate the look and feel of your patterns.

Homework

  1. Post your Phase 1 of Project #2 writing to the class blog, describing the pattern, repetition, line, shapes you “hear” in your favorite song. Comment on at least 3 other students posts.
  2. Complete Staccato / Legato Pattern Mashup PREP (See Lab 1 above).
  3. Post an image or image gallery of your Humument pages.
    • Post title: Humument #1
    • Category: Humument
    • Tags (some or all, depending on your compositions): Organic Shape, Geometric Shape, Frame, Figure-Ground, Obvious, Ambiguous, Positive Space, Negative Space, Unity, Economy
  4. Materials Needed: Sketchbook with and variety of pencils — plus inking pens, 9×12″ bristol.

Print this page Download PDF

COMD Class 6 | Critique and Humument

September 21, 2015

Class Prep

  1. ALL PARTS OF Project #1 are DUE.
    • Bring all work to class for critique.
    • Label your inked thumbnails and cut paper compositions ON THE BACK with your full name and the project number (ie: Project #1)
    • Protect your work with tracing paper and transport in a portfolio (refer to recent demo).
  2. Materials needed THIS class:
    • Sketchbook
    • Pencils (wide range from 4h to 4B)
    • Inking pens (range from thick to thin)
    • HUMUMENT BOOK!!! If you don’t have your book, points will be deducted from your grade.

Critique

  • Present your Project 1 work to the class.
  • State your full name and your understanding of the project goals (ie: what is the point?)
  • Discuss and analyze your finished work in terms of concept, craft, and the design process.
  • Cleary describe what works and what doesn’t work using the project vocabulary:
    • Shape (Organic, Geometric)
    • Frame
    • Figure-Ground (Obvious, Ambiguous, positive space, negative space)
    • Unity
    • Economy
  • Your peers and professors will provide constructive feedback.
  • Take a photo of your work as it is presented in the critique to use on your final Phase 4: Delivery post.

Discussion / Lab

Using Tom Phillips’ original Humument project as a guide, create a series of pages in your chosen book that demonstrate the concepts we’ve covered in class so far.

Each page should clearly visually communicate these concepts to your reader/viewer:

  • Shape (Organic, Geometric)
  • Frame
  • Figure-Ground (Obvious, Ambiguous, positive space, negative space)
  • Unity
  • Economy

Experiment with blocking out and/or revealing certain areas of text or individual words to communicate your concepts.

Use pencils, inking pens and black paper (collage) to create your pages.

These should be beautiful objects when complete.

Homework

  1. Finish Humument work and come prepared to present to the class.
  2. Complete your final post (Phase 4: Deliver) for this project:
    • Create a new blog post called Urban Artifact: Phase 4.
    • In the post, document your thoughts about this project. Think about what you learned, what you could have done better (planning, material use, craft), and how you will apply what you learned to your next project. Consider and respond to the comments made in class during the critique.
    • Include the photo of the work as it is presented during the critique (ie: hanging on the wall).
    • Don’t forget to comment on at least 3 other student’s posts.

Materials needed for next class:

  • Sketchbook
  • Pencils (wide range from 4h to 4B)
  • Inking pens (range from thick to thin)

Print this page Download PDF

COMD Class 5 | Cut Paper Compositions

September 16th, 2015

Materials needed THIS class (see Supply List for specifics):

  • 14×17″ Bristol
  • black drawing paper
  • scissors
  • exacto knife
  • glue
  • ruler/t-square
  • pencils
  • tape
  • sketchbook (always)
  • FINISHED Inked Sketches

Project Review

  1. Take a moment to read through ALL of the Project #1 guidelines.
  2. Reform your groups from last class and discuss the project goal and requirements.
  3. Make sure you are all in agreement as to what needs to be turned in next class.
  4. 1 ambassador from each group will explain the project guidelines to the class.

Critique

Students present finished Inked Sketches to the class for critique.

Demo

Phase 3: Develop – Cut Paper Compositions

Materials Needed: 1 sheet 14×17″ Bristol, black paper, scissors, exacto knife, cutting mat, glue, ruler/t-square, pencils, tape.

  1. Based on feedback from your inked sketches, choose the most successful obvious and ambiguous figure-ground compositions.
  2. Using your finished compositions as a guide, create 2 figure-ground relationships (1 obvious, 1 ambiguous) using black paper cutouts.
  3. With subtlety and economy, attempt to re-create and refine your compositions to communicate an emotion or concept, such as tension, loss, power, weakness, silence, energy, etc. Ideally the content (meaning) should relate back to your experience of finding these artifacts or the story you have imagined.
  4. These 2 compositions should be a culmination of the creative process so far. They should represent your most successful attempts at this design problem.
  5. On a sheet of 14×17″ Bristol Board, measure 2 rectangles with your ruler. There should be a 3″ margin on the bottom and 2″ margins on the top and sides. Between each rectangle there should be a 1″ margin.
  6. Using black drawing paper, scissors, exacto knife, ruler/t-square, glue, cut the black paper to desired shapes (figure) and arrange them on the bristol (ground). Refine and recut as necessary until you are satisfied that the whole composition functions in a unified way. It should be clear that both the ground and figure have been considered.
  7. Once you are satisfied with your compositions, using a hard (4H) pencil, lightly mark the contour/outline of each shape before you remove it.
  8. Then very carefully, using the gluing technique demonstrated in class, glue the shapes to the bristol.
  9. Package and protect your work using tracing paper.

Documentation and Feedback

  • Create a new blog post called Urban Artifacts: Phase 3.
  • Write a short description of this part of the project and how it relates to the previous phase.
  • Take photos of your finished cut paper compositions and add them to the post (make sure they are well-lit and in focus.)
  • Include the hours that you worked on this part of the project.
  • Don’t forget to comment on at least 3 other student’s posts.

Individual Meetings / Lab Time

  • Cut Paper Compositions and all parts of Project #1 are DUE next class. If you have questions or need extra help, now is the time to ask!
  • Work independently (and silently). Feel free to listen to music using headphones!

Homework

  1. ALL PARTS OF Project #1 are DUE. Bring everything to class for critique.
    • Read guidelines thoroughly and make sure you have completed everything.
    • Label your inked thumbnails and cut paper compositions ON THE BACK with your full name and the project number (ie: Project #1)
    • Protect your work with tracing paper and transport in a portfolio (refer to recent demo).
  2. Materials needed next class:
    • Sketchbook
    • Pencils (wide range from 4h to 4B)
    • Inking pens (range from thick to thin)
    • HUMUMENT BOOK!!! If you don’t have this book by next class, points will be deducted from your grade.

Print this page Download PDF

COMD Class 4 | Meetings & Lab Time

September 9th, 2015

Materials need for THIS class (see Supply List for specifics):

  • NEW ITEM: Faber-Castell Pitt Big Brush Pen
  • pad of Bristol board (9×12″ Bristol 2-ply smooth plate finish)
  • inking pens (.02, .05, and brush – Pigma Micron or similar)
  • ruler/t-square/triangle
  • 2H-4H pencils
  • drafting or removable tape
  • roll of tracing paper (18+” wide)
  • portfolio
  • sketchbook (always)
  • Inked Sketches (In Progress)
  • Hardcover or paperback for Humument Project

DEMO

Protecting and submitting your work

When you submit your final work, demonstrate a dedication to your design practice and show a sense of professionalism. Protect your work from smudges, wrinkles and bends by covering it with a piece of protective paper.

  1. Cut a piece of tracing paper to the width of your work with about 1″ overhang on the top.
  2. Fold the 1″ overhang and tape it with a piece of drafting tape to the back of your work.
  3. Protect your work from spills, rips, and other accidents by carrying it to and from school in a protective portfolio.
  4. Write your full name and the project number (ie: Project #1) on the BACK of the work in lower right corner.
Yes!

Yes!

NO!

NO!

Lab

  • Work independently (and silently). Feel free to listen to music using headphones!
  • By the end of class you should have completed at least two of the four compositions.
  • Individual meetings with Professor.

Homework

  1. Finish Inked Sketches (2 stable, 2 ambiguous) to present to class for critique.
    NOTE: Don’t forget to protect your work with tracing paper. Points will be deducted from your grade if your work is smudged, wrinkled or bent.
  2. Review Project #1: Develop > Cut Paper Compositions and come prepared to work in class.
  3. Complete Design Process Blog posts for Project #1: Phase 2: Define

Materials needed next class (see Supply List for specifics):

  • 14×17″ Bristol
  • black drawing paper
  • scissors
  • exacto knife
  • glue
  • ruler/t-square
  • pencils
  • tape
  • sketchbook (always)
  • FINISHED Inked Sketches

Print this page Download PDF