October 5, 2015
What’s needed for this class?
- Post your Phase 1 of Project #2 writing to the class blog.
- Complete Staccato / Legato Pattern Mashup PREP
- Post an image or image gallery of your Humument pages.
- Post title: Humument #1
- Category: Humument
- Tags (some or all, depending on your compositions): Organic Shape, Geometric Shape, Frame, Figure-Ground, Obvious, Ambiguous, Positive Space, Negative Space, Unity, Economy
- Materials Needed: Sketchbook with and variety of pencils — plus inking pens, 9×12″ bristol.
Critique
- Present your refined Staccato / Legato Pattern drawings.
- When critiquing your colleagues’ work, remember to identify which patterns are successful AND WHY THEY ARE SUCCESSFUL and which patterns are not successful AND WHY THEY ARE NOT SUCCESSFUL.
- The goal is to help your colleagues successfully realize this part of the project and “solve” the design problems presented.
- Try to use of the vocabulary: Line, Rhythm, Repetition, Monotony, Variety, Pattern, Organic, Geometric and Movement
Lecture
- Review Elements and Principles
- Discuss examples of Repetition in web design from Design Meltdown
- How are pattern and rhythm used?
- Regular pattern repeats elements in timed or predictable intervals.
- Progressive pattern repeats elements, but changes in size or color to create progressive steps.
- Flowing patterns are organic or natural feeling patterns that create movement
Lab
Pattern Mashup Work
Once you have created a total of 6 strong patterns (3 Staccato and 3 Legato) move on to the next step. Refer to class pattern examples for ideas.
Goal:
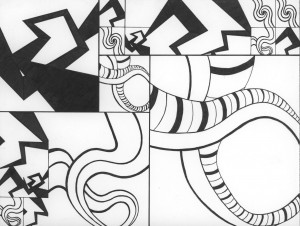
- On 9×11″ Bristol create 1 final inked composition using 1-2 Staccato and 1-2 Legato pattern squares. The finished composition will be a field of pattern squares of varying scale (big, medium, small), orientation (horizontal, vertical, reflected, rotated) and should demonstrate an obvious rhythm by uniting the patterns representing Staccato and Legato, like a DJ mixing parts of different songs.
- Even though the composition will be a field of pattern, it should feel unified.
Process:
- Design a grid to act as an invisible or visible structure to support the elements of your composition (the staccato and legato pattern squares).
- Create at least 3 possible layouts in your sketchbook.
- Explore how you will arrange your pattern squares within the grid to create a unified composition.
- Questions to ask:
- How will my different staccato and legato patterns relate to each other?
- When the patterns meet/touch will they complement each other, blend together, or repel each other?
- What will the overall composition “sound” like?
- Some squares should be larger, some should be smaller, all should repeat at least twice.
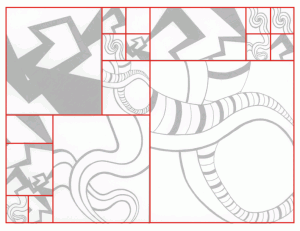
- Here is an example of a grid used by a student. Notice how the squares of the grid vary in size and placement on the page. The relationship between the squares on the grid should contribute to the overall rhythm and unity of the composition.
Project Research:
- Explore this project :: Seaquence :: to experiment with mixing audio rhythms. Imagine how you can replicate this experience visually using the Staccato and Legato pattern squares you’ve created.
- Another place for pattern inspiration might be a search for “quilts” or “crazy quilts” or textile design.
- Explore how other students have realized the Pattern Mashup project:
Before the end of class:
- Make at least 3 sketches (or collages) in your sketchbook to explore how you will arrange your final inked Pattern Mashup. These are NOT thumbnails, these are preparatory drawings that you will use to complete your final inked compositions.
- Ask the Professor to review your work. If the work is approved, you may begin work on your final inked Mashup on 9″x12″ bristol board.
Homework
- DUE: Final inked version of your Pattern Mashup on a piece of 9″x12″ bristol board, based on your finalized preparatory compositions. Come prepared to present your work!
- Post to the blog.
- Create a new blog post called Sound Visualizations: Phase 2.
- Take photos of your finished Inked Pattern Mashup and add them to the post (make sure it is well-lit and in focus.)
- Include the hours that you worked on this part of the project.
- Don’t forget to comment on at least 3 other student’s posts.
- Materials needed: Flash/jump drive.
- Contact me with questions.
Print this page 

