Web Design: AD550
COURSE CALENDAR | WEEK 04 CLASS OUTLINE | HOMEWORK
- Review: Defining a Site in Dreamweaver.
- Upload student portfolio sites to FTP (example site)
- EXERCISE: Define bio.html, projects.html, contact.html
- Finalize your index.html and resume.html pages. We will use these pages as template for additional pages.
- Replace your plain <html> with html +
the XHTML namespace:
<html xmlns="http://www.w3.org/1999/xhtml" xml:lang="en" lang="en"> - In the head of your document add the Document Character Set
<meta http-equiv="Content-Type" content="text/html;charset=utf-8" /> - You don't need to add actual content to bio, projects and contact, but instead use Lorem Ipsum text for place holder paragraphs.
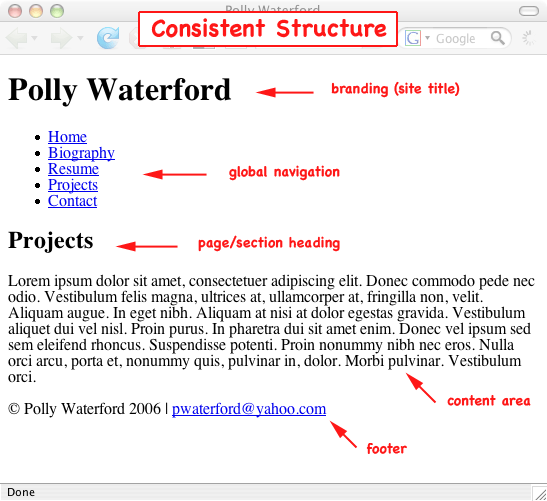
- Consistent Structure: You will need to take into account the architecture of the information you are presenting and make sure the following major Site Components are included on every page.
- Branding (Site Title)
- Global Navigation
- Page or Section Heading
- Content Area
- Footer (including copyright and email link)
- Make sure all links are functioning and your site is uploaded to your folder on the FTP Server.
- CHECK YOUR SPELLING AND GRAMMAR!
- EXERCISE: Fill out this sample
client survey
- What a designer needs to know before he/she begins a project.
- Web Design Vocabulary:
- Site and Navigation Design: Sample Site Map | 01 | 02 |
- Interface / Page Design: Sample Wireframes | 01 | 02 | 03 | 04 |
- Graphic Design for Web Designers:
- Graphic design on the web is not just about aesthetics, it's about supporting usability and functionality.
- Today's web style and common features
- Define clear relationships between elements:
- Visual Hierarchy and Visual Organization
- A Design Grid ensures consistency and predictability.
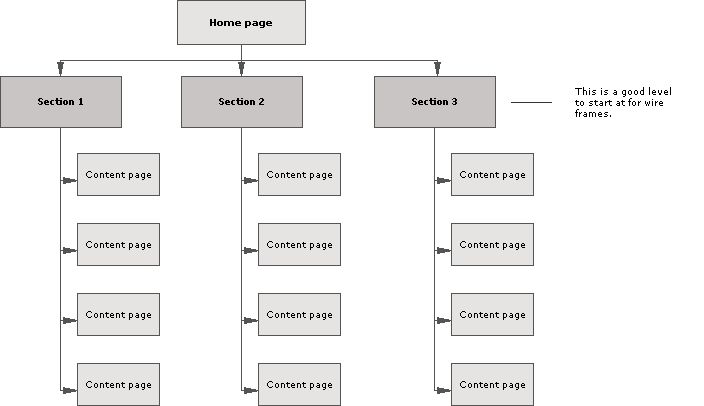
- Wireframes are the first step in defining the placement of major site components. They used as blueprint for the skin of a site.
- Tools to differentiate: Color, Contrast
- Tools to associate: Grouping, Containment, Alignment, Rhythm
- Type on the web: It is good practice when selecting fonts to choose from the default fonts for most operating systems: specifically Windows and Mac. Fonts outside these defaults are unlikely to be available to all users. This causes the browser to render the text in its default font.
- Color on the Web: Choose two to three colors for your
color scheme: a main color and an accent color. Think about the colors
you choose and what they mean or imply to a user.
- “Nature’s colors are familiar and have a widely accepted harmony.”—Edward Tufte
- Visit Design Meltdown and look at sites with Blue and Green, then look at sample of Purple. The web has stretched the usage and meaning of color in all directions, but certain colors still evokes different moods and reactions.
- Colour Schemes
- Color Theory Tutorial understanding color
- RGB/HEX Chart
- Color blender great for finding a quick color scheme
- Color Theory for the color blind and designing for those with different ways of seeing
- Colorblind web page filter --- cool!
- EXERCISE: Creating a Color Palette
- Colour Schemes: Your color scheme should reflect the purpose and persona of your site. It should be appropriate to the identity you want to convey to your audience.
- Sites for Reference: Find a website with a color scheme you like. Then find a website with the graphic style you like. Use these two sites as the basis for the visual design of your web site.
- EXERCISE: Creating Mockup Interface in Photoshop
- Follow these instructions to get started.
- You will be creating a mockup, based on this wireframe. Use this mockup as a guide.
- Define the following sections
- Body (background color or pattern)
- Container
- Branding / Header (Logo and Site Title)
- Global Navigation
- Content
- Sidebar
- Section Heading (h2)
- Copy (sub-headings, paragraphs, lists, bullets and inline links)
- Footer (copyright and email link)
- The mockup should show the client how the final interface will look. Specify logo, color scheme, fonts and positioning. (example)
- Branding / Header: Create a logo, photograph or digital image to identify the "brand" of your site. This should also embody your Site Persona, work with your color scheme, and define your graphic style. The branding area is 767px wide by 126px high (the height can be adjusted to your choice). Using the text tool add the name of your site. In this case, it's Your Name.
- Choose or create a subtle pattern for the body background of your mockup. This is the area outside of the area that contains your site components.
- Choosing Fonts for your website: Use appropriate typography. Your chosen typeface should work with the visual style and textual content.
- Work on your mockup based on this wireframe, and color palette, as discussed in class. Bring the PHOTOSHOP or ILLUSTRATOR file to class. (SAMPLE)
- Next week will learn about PRESENTATION (Cascading Style Sheets), so have your color scheme and font decided on before we start. Bring a palette like this sample.
- If you are having trouble finding your color scheme read through this tutorial