Vector Art: AD360
TECHNICAL SUPPORT | Preparing for Print Overview
Preparing a document for print and avoiding output problems:
NOTE: make sure you create a backup of your file before making the following adjustments.
- Add crop and trim marks -- these marks indicate where the page should be cut. They are especially important when you've designed artwork that contains bleeds. Bleeds are areas where the ink goes past the edge of the printed page to make sure no unwanted white space appears. There can only be one set of crop marks (Object > Crop Marks > Make), but you can make many trim marks (Filter > Create > Trim Marks). If your illustration is to be placed in a layout program, don't use crop or trim marks.
- Add printer's marks -- these include registration targets and variations called star targets, calibration bars and labels fro the particular separation or printing plate. The registration marks help the printer align the printing plates so that the inks are placed exactly on the paper. The calibration bars help the printer maintain the color values. These marks can be added by a check box in the Separations Setup dialog box.
- Specify the Rasterization Settings -- The third section of the Document Setup window, Transparency, controls how an image will be rasterized on output. The Flattening settings has a slider showing the Raster / Vector balance. Dragging the slider toward Rasters makes it easier to output your artwork, because more of it gets rasterized. This however, can result in reduced quality. It is best to keep the default settings unless you have output problems.
- Slim the File -- Delete all unused brushes, swatches, symbols and styles. Each of these palettes has a command called Select All Unused. Use that command followed by Delete. Check your Layers palette for hidden items. Show and unlock everything. If there are unneeded items consider deleting them now.
- Check Spelling -- Correct any errors using Type > Check Spellling.
- Clean up the Artboard -- use the menu command Object > Path > Clean Up. This can rid your document of potentially problematic points and objects.
- Rasterize Effects, Blends, Gradients, Gradient Meshes and Transparency -- by rasterizing these objects it makes them easier to print. Some effects and filters can create very complex objects. If it takes a long time to create or draw onscreen consider rasterizing.
- Convert Large Type to Outlines -- change headline type (not paragraphs of type) to outlines to solve printing problems.
- Splitting Long Paths -- a path with too many anchor points can choke an imagesetter. If you are getting an error message limit-check or virtual memory error, open Document Setup, choose the Printing & Export section and check the box for Split Long Paths. Try printing again.
- Don't forget to include Linked Images and Fonts -- if you have linked any bitmap images to your Illustrator document or if you are using a unique font you will need to send everything to the printer. Check to see you have included everything by using the Document Info palette. Remember to deselect Selections so you get data from the entire document.
Printing Terms and Processes:
- Halftone Screens: a printing device used to break artwork up into a series of dots of various sizes. These screens are overlayed at different angles to produce a full range of printed color using CMYK. The size of the dots determines how light or dark colors appear in print. The smaller the dot, the lighter the color appears; the larger the dot, the darker the color appears.
- Screen Frequency: the halftone screen is measured in lines per inch (lpi). The relationship between the image resolution and the screen frequency determines the quality of detail in the printed image. As a general rule, high-resolution output devices (dpi) use higher screen frequency (lpi) to produce the highest quality images
- Trapping: is a technique used by printers to slightly overprint the
colors along common edges of two objects. It is used to compensate for
any gaps or color shifts between the objects caused by misregistration
when printing. Trapping may not always be necessary when objects share
a common color.
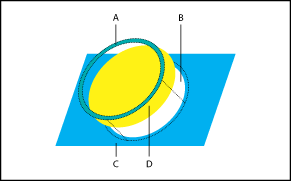
Function of Trap command A. Area of overprint B. Area of knockout C. Background color D. Foreground colorThere are two types of traps:

Spread: this is where a lighter object overlaps a darker object. The lighter object color "spreads" into the darker background.
Choke: this is where a darker object overlaps a lighter object. The darker object color is squeezed or "choked" by the lighter background color
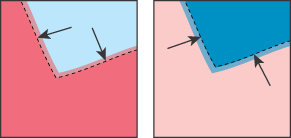
- Overprinting: this is where an object is specified to print on top
of the object underneath rather than the default knockout. It is the
simplest method used to prevent misregistration.
For more precise control of trapping and for trapping complex objects, you can create the effect of a trap by stroking an object and setting the stroke to overprint. You may want to overprint in the following situations:
- Overprint 100% black lines against a color background when the illustration style allows.
- Overprint when the artwork does not share common ink colors and you want to create a trap or overlaid ink effects.
- Remember that Process Colors are transparent. For example, if you print a fill of 100% magenta over a fill of 100% cyan, the overlapping fills appear violet, not magenta.
Things to keep in mind when preparing an image for 4 color printing:
- Determine the ink type - spot or process (unless a color is told to separate into its four-color components it will output as a spot color.)
- Determine which elements will be colored
- Refer to a printed Swatch book when selecting color. Don't use a spot color guide to define process colors and visa versa.
- Define the colors. It's easy to change color definitions down the road, if needed.