Vector Art: AD360
TECHNICAL SUPPORT | Pathfinder Palette NOTES
Compound Paths, Compound Shapes, Pathfinder Palette, Path Commands
A Compound Path consists of two or more simple paths that have been combined to form a new compound object. One useful aspect of compound paths is that a hole can be created where the original objects overlapped. These holes are empty areas cut out (like a donut or the letter O), through which other objects can be seen. In addition, you can use compound paths to force multiple objects to behave as if they are a single unit. For example, they could be used as a mask.
The Compound Path command can be found under Object > Compound Path
> Make. To release a Compound Path go to Object > Compound Path
> Release. The new compound object takes on the appearance of the topmost
object.

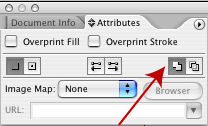
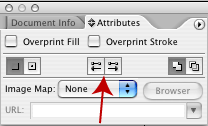
FILL RULES: When a simple path intersects itself one or more times, the spaces defined by the overlaps can be filled in one of two ways: the default Non-Zero Winding Fill Rule, or the Even-Odd Fill Rule. Under the Even-Odd Fill Rule, every other space gets filled. To specify the Even-Odd Fill Rule, choose Window: Attributes, and on the Attributes palette, click the Use Even-Odd Fill Rule button. To change it back to the default, click on the adjacent Use Non-Zero Winding Fill Rule button. When the Non-Zero Fill Rule is applied, there are two additional commands that you can use to control which spaces are filled or left as holes; they are the Reverse Path Direction On and Reverse Path Direction Off commands, on the Attributes palette. Changing the direction of a path within a Non-Zero compound path flips the fill/hole relationships of the spaces enclosed within that path. More info...


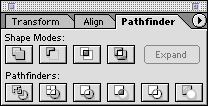
The Pathfinder palette contains several
tools to create a new, closed path(s) or a compound path from two or more
selected and overlapping objects by merging together, subtracting from
one another and dissecting into segments. The Pathfinder palette contains
two rows of buttons. The upper row contains Shape Modes buttons, the lower
row contains the Pathfinder buttons. For best results apply Pathfinders
to filled, closed paths. Pathfinders cannot be applied to objects which
have gradient mesh or effects applied. But you can make compound shapes
from objects to which effects have been applied. However, only the distort
and warp effects will appear in the compound shape. If you no longer need
to make changes to the Compound Shape, the Expand button can be used to
remove the invisible paths you no longer need. This result unifies the
shapes into one path on one layer.
Compound Shapes do more than just combine two or more shapes into a single object. A compound path appears as a single object on a sublayer in the Layers palette until it's released. A compound shape appears as editable art in the layers palette with every object in the shape on a separate sublayer. This gives you much more control over editing complex objects.
Shape Modes:
- Add to shape area: Joins the outer edges of selected objects into one compound path object. Interior objects are deleted. Paint attributes of front most object are applied to new object
- Subtract from shape area : Subtracts the front most selected objects from the backmost object. Paint attributes of front most object are preserved.
- Intersect: Creates a new object from shared space. Deletes any non-overlapping, selected objects. Paint attributes of front most object are applied to new object. Selected objects must partially, but not completely, overlap to apply this command.
- Exclude: Removes an overlapping area. Areas where an even number of selected objects overlap become transparent; areas where an odd number of objects overlap are filled. Paint attributes of front most object are applied to new object.
Pathfinder Commands:
- Divide: Divides overlapping areas of selected paths into separate, non-overlapping closed paths or lines. The new objects keep their original fill and stroke colors. Divided objects can then be modified by using the group selection tool.
- Trim: The front most object shape is preserved; parts of objects that are behind it and overlap it are deleted. Adjacent or overlapping objects of the same color or shade remain separate (unlike merge command). Objects retain their original solid or gradient fill colors; stroke colors are deleted.
- Merge: Operates on adjacent or overlapping objects with the same fill color, uniting them into one object. If the overlapping objects have different fill colors, similar objects are united and the other objects are trimmed. The front most object shape is preserved; Objects retain their original solid or gradient fill colors; stroke colors are deleted.
- Crop: The front most object "trims" away areas of selected objects that extend beyond its borders. The remaining on-overlapping objects retain only their fill colors; stroke colors are removed. The front most object is also removed. Like a mask, the Crop command allows only objects directly beneath the front most object (mask) to be displayed. Unlike a mask, the original objects are deleted, unless you Undo right away.
- Outline: Objects turn into paths with a stroke of 0. The fill colors of the original objects become the stroke colors and fill colors are removed. Where any segments overlap, the lines are divided. Use this command to create strokes on individual sides of objects that originally had a stroke of None.
- Minus Back: Subtracts the backmost selected objects from the front most object. Parts of the objects that overlap the front most are deleted. Paint attributes of front most object are applied to new object. Selected objects must partially overlap for this command to work.
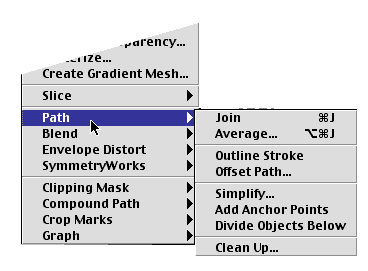
More Path commands (under Object menu > Path)

- Divide Objects Below: Cuts objects by using an overlapping
front most selected object.
- With the selection tool, select the object to use as a cutter, and position it so that it touches the object to cut. The object cuts any filled object or objects that it’s touching. Choose Object > Path > Divide Objects Below. The shapes that result are ungrouped and selected.
- Outline Stroke command: Traces the outline of all
stroked paths within the selected artwork and substitutes a filled object
with the same width as the original stroked path.
- With the selection tool, select the artwork to outline. The artwork can contain filled and stroked paths; however, only stroked paths are outlined. Select Object > Path > Outline Stroke. The outline replaces the original artwork and is selected.
- Offset Path command: Creates a replica of a path,
offset from the selected path by a specified distance
- Select the paths you want to offset. Select Object > Path > Offset Path. Specify the offset distance, line join type, and miter limit. (Miter Limit specifies how far out a stroke can extend as it changes its direction along a path before it changes from a mitered (pointed) join to a beveled (squared-off) join. The default value of 4 means that when the length of the join's point becomes four times the stroke weight, Illustrator will automatically change the miter join to a bevel join.)

