Graphic Design Principles 1 (Fall 2018)

Fall 2018 | COMD1100_D108 | Prof. Spevack

Page 2 of 4

Class 21 | Color

November 12, 2018

What’s Due?

Check to make sure you have completed ALL PARTS OF Project #3. 

  • Turn in mounted Broad-Range Collage, Narrow-Range Collage, Painting, and Digital Collage

Materials Needed

Critique

  • Hang up your finished, mounted Broad-Range Painting & Broad-Range Collage and Narrow-Range Digital Collage & Narrow-Range Collage

Lecture/Discussion

  • What is color? And how do we see it?
  • What are Primary and Secondary Colors?
  • What do the CMY, RGB, and RYB color models represent?
  • What is a color wheel?

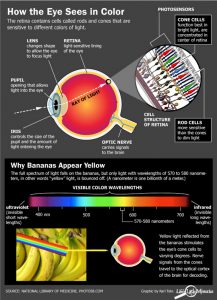
Introducing Color:  When light hits objects, some of the wavelengths are absorbed and some are reflected, depending on the materials in the object. The reflected wavelengths are what we perceive as the object’s color.

Visible light is made of seven wavelength groups. These are the colors you see in a rainbow: red, orange, yellow, green, blue, indigo, and violet.

Our eyes are the input channels for this light and our retina contains different types of light sensors.

  • Rods: record brightness and darkness (value).
  • Cones: Each one optimized to absorb a different spectrum range of visible light. (1) One set absorbs long, low-frequency wavelengths, the reds. (2) Another absorbs mid-size wavelengths, the greens. (3) The third absorbs short, high-frequency wavelengths, the blues.
color-vision-100427-02

http://www.livescience.com

Watch these short videos to understand how and why we see color:

NEW Vocabulary:

  • Hue: Designates the common name of a color, determined by the specific wavelength of a ray of light and/or its position in the spectrum or color wheel.
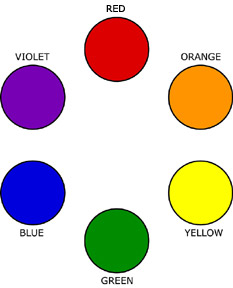
  • Primary Colors: Three colors when mixed in equal or unequal amounts can produce a variety of colors. Traditional primary colors are: Red, Yellow, Blue
  • Secondary Colors: Colors created by mixing equal proportions of any two primary colors. Traditional secondary colors are: Orange, Green, Violet

RGB Additive Color Model (Light/Digital)

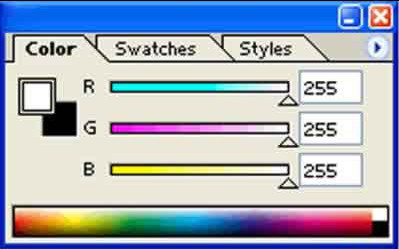
RGB Color

RGB Color

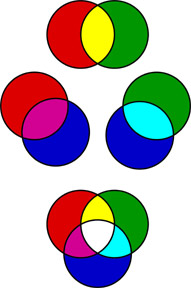
Humans can perceive three primary colors of light: red, green and blue. When overlaid or “added together”, they produce the secondary colors of light: yellow, cyan and magenta as in the diagram. Your digital devices all rely on RGB light to produce all the colors your see on screen.

  • Red and green light together are perceived as yellow.
  • Blue and green light together are perceived as cyan.
  • Blue and red light together are perceived as magenta.
  • All the other perceived colors can be produced by blending specific amounts of red, green and blue light.
  • White light can be produced by mixing a color light and its opposite or equal amounts of red, green and blue light.

CMY Subtractive Color Model (Printing / Pigment / Real Life)

CMY Color

CMY Color

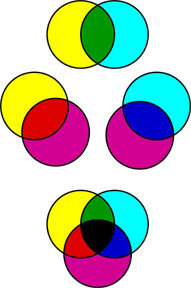
The absorption and reflection of the light that shines on an object produces the color that we see. Each color of pigment absorbs its opposite (complementary color) and the rest is reflected back at us as color. This is called “Subtraction.”

  • Magenta pigment absorbs green light and reflects red and blue light, which we see as magenta.
  • Yellow pigment absorbs blue light and reflects red and green light, which we see as yellow.
  • Cyan pigment absorbs red light and reflects green and blue light, which we see as cyan.

The color of the light that is not “subtracted” and reaches our eyes determines what color we see. Light on a black object subtracts all colors and no light is reflected. Light on a white object does not subtract colors and reflects all the colors.

Digital Color Mixing

RGB CMY(K) complements

RGB CMY(K) complements


Color Wheel

color wheel is an organization of hues around a circle. It is a tool used to help us understand color relationships and is traditional in the field of art and design. Sir Isaac Newton developed the first circular diagram of colors in 1666. Since then, scientists and artists have studied and designed numerous variations of this concept.  
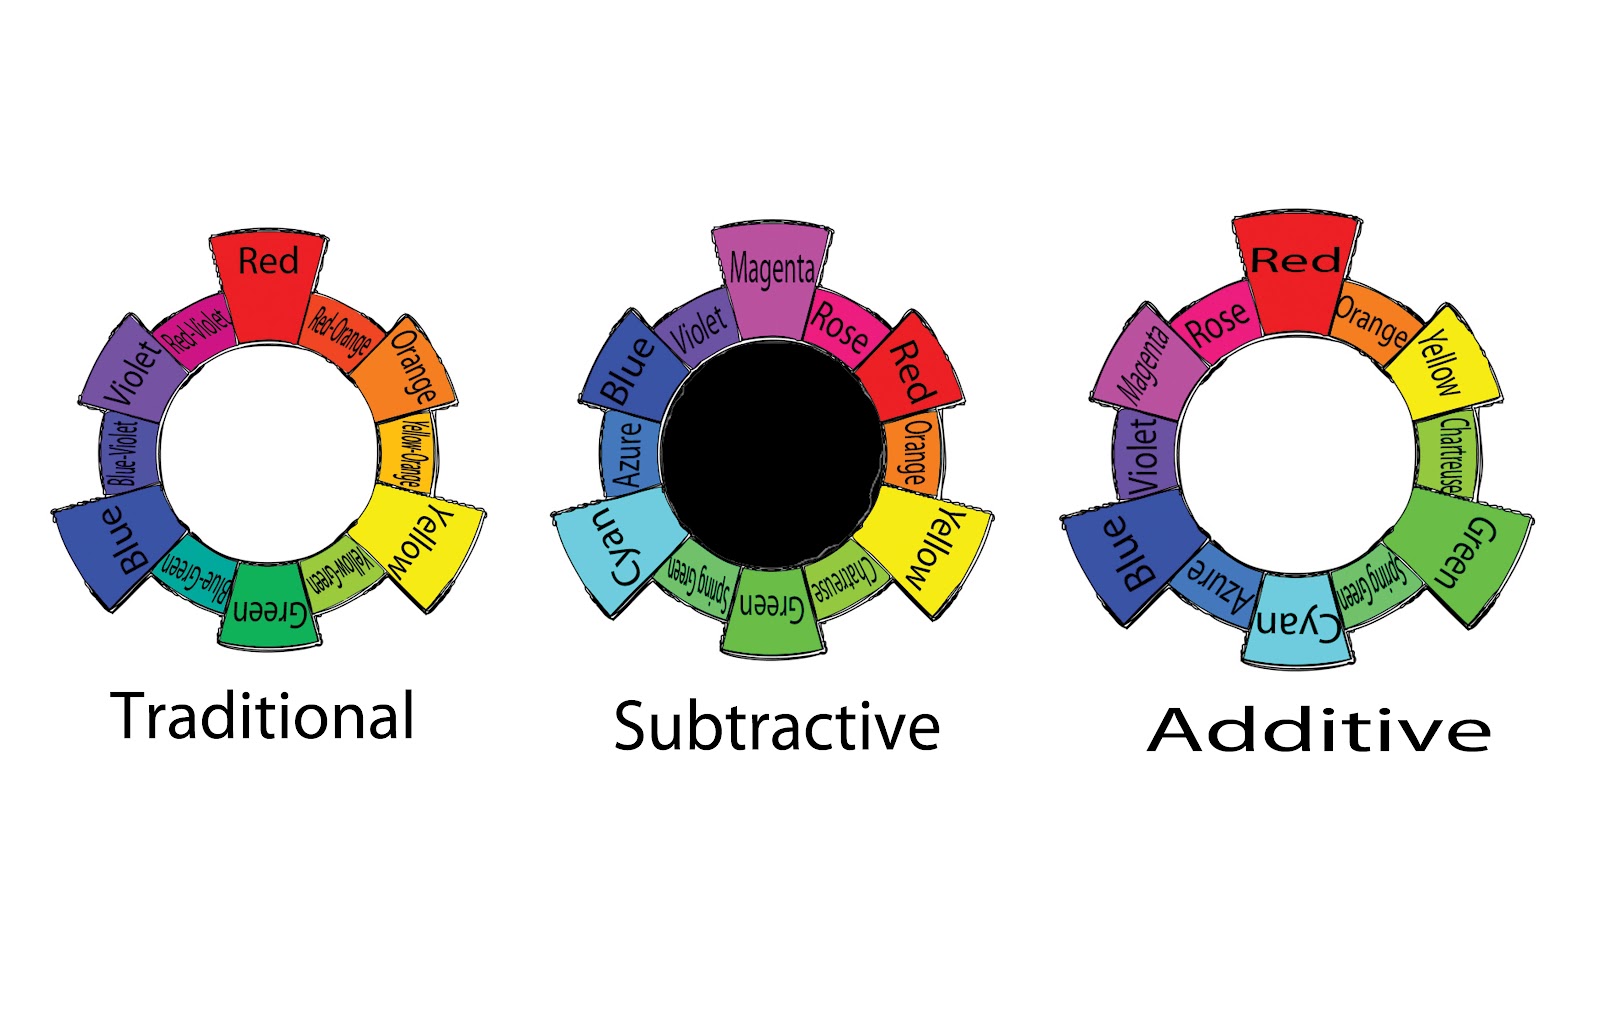
RYB Color Wheel (Traditional)

  • Primary Color Triad: Red, Yellow, Blue
  • Secondary Color Triad: Orange, Green, Violet
    • orange (mix red + yellow)
    • green (mix yellow + blue)
    • violet  (mix blue + red)

RYB Color Wheel

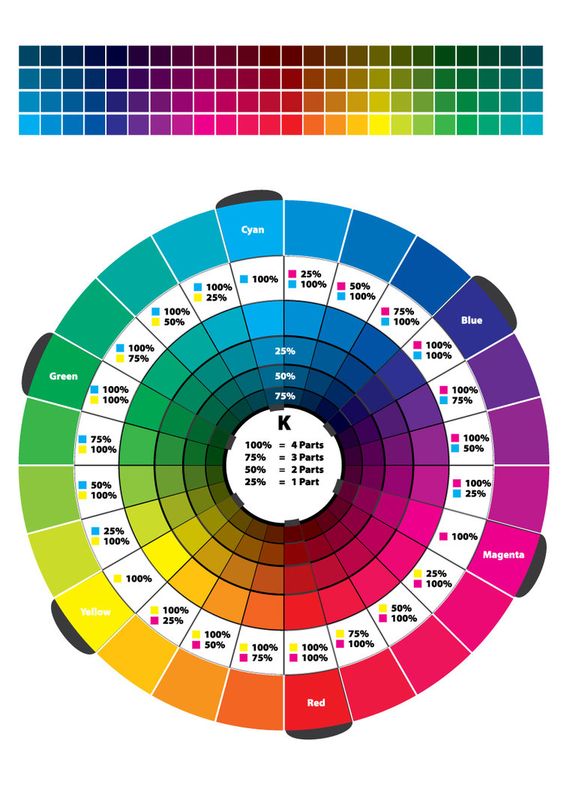
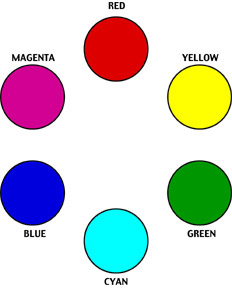
CMY Color Wheel (Contemporary)

  • Primary Triad: Cyan, Yellow, Magenta
  • Secondary Triad: Red, Green, Blue
    • Green (Yellow + Cyan)
    • Red (Yellow + Magenta)
    • Blue (Cyan + Magenta)
CMY Color Wheel

CMY Color Wheel

Lab: Color Wheel FreeStudy

cmyrgb-colorwheel


Visible Spectrum http://en.wikipedia.org/

Visible Spectrum http://en.wikipedia.org/

Starter Color Wheel:

  1. Using the template file provided, work independently to accurately fill in the color wheel using the Paint Bucket and CMYK Color palette sliders.
  2. Start with the primary triad from the CYM system (Cyan, Yellow, Magenta)
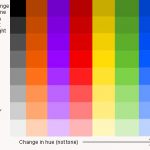
  3. Then fill in the RYB system (Red, Orange, Yellow, Green, Blue, Violet) using the percentages in the color wheel above.
  4. Save the file as firstintial_lastname_ColorWheel.psd

Unique Color Wheel:

Once you have successfully experimented with the triad relationships (primary and secondary) from both systems, work with your partner to plan out a unique Color Wheel.

  • Think about how the colors relate to each other.
  • What does each color represent: mood, emotion, object.
  • Choose an object, animal or word to represent each color.
  • Find hi-quality, free stock images using the sites listed below to visualize your color wheel concept.
  • Make sure your final color wheel composition is laid out with a clear connection to the original primaries and secondaries.
  • In the Photoshop file, use the Layer Group called YOUR COLOR WHEEL.
  • Open your stock images and drag the image layer into your Color Wheel file.
  • Create Clipping Masks for each color / image group. Make sure you are doing this in YOUR COLOR WHEEL.
  • Each partner will create their own color wheel, based on your shared concept.

Here are some examples of interesting color wheels:

Use the following resources to find free stock photo or royalty-free images:

Export:

  1. Save your the firstinital_lastname_ColorWheel.psd file.
  2. Export your STARTER COLOR WHEEL and MY COLOR WHEEL as two separate PNGs by choosing Export > Export As from the File menu.
  3. Reduce the image size on export to 50%. Use the following settings:
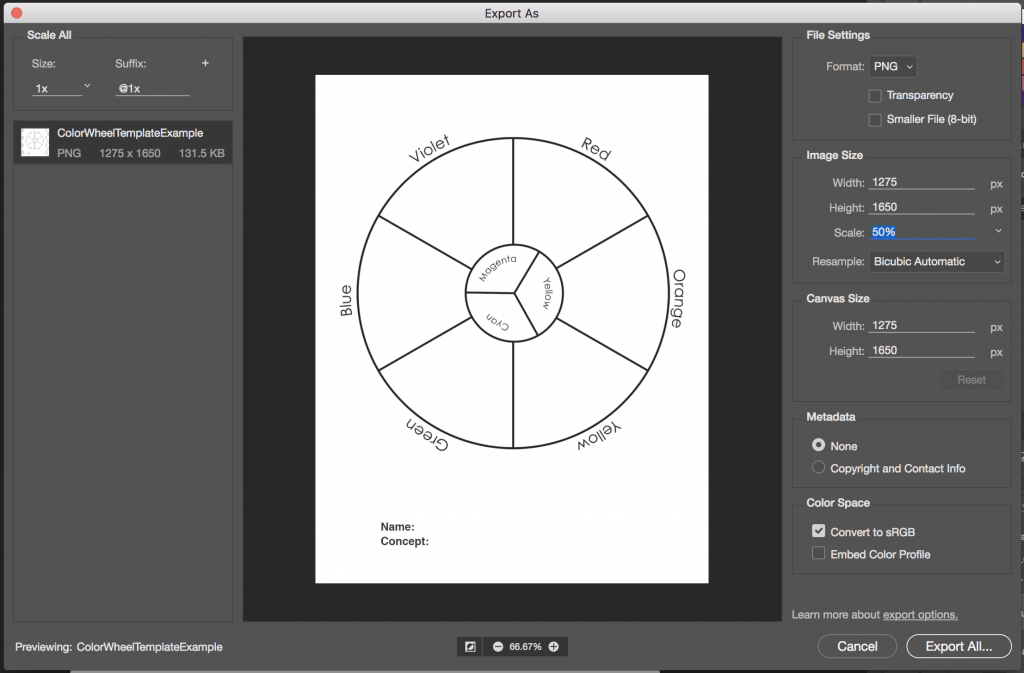
    screenshot

    File > Export > Export As

HOMEWORK

DUE: Completed Color Wheel FreeStudy.

  • Post an image of 1) your Starter Color Wheel and 2) your unique Color Wheel to the Class Blog (see Phase 1: Discover).
  • Don’t forget to comment on at least 1 other student’s posts.

Glossument Reminder: We will have our third critique on November 26th. You should have completed at least 8 visualizations of glossary words and begin thinking about an overall theme or connection between the words.

Supplies Needed for Color Painting!

Class 20 | Digital Value

November 8th, 2018

What’s Due?

  • Your completed Broad-Range Painting.

Materials needed:

  • Thumb drive with your original portrait
  • Come prepared to complete a digital collage in photoshop.

Color Painting Supplies for the next project:

Show and Tell

  • Anyone have any interesting design-related ideas, objects, or events to share?
  • Augmented Reality

Review: Classroom Etiquette

Learning is a group activity. The actions of each person in class affects the learning outcomes of others. You are a college student and you are expected to act in a mature manner; to be respectful of the learning process, your fellow students and your instructor. Review Syllabus: CLASSROOM ETIQUETTE

Demo: Digital Collages in Photoshop

Materials Needed:

  • Your hi-res portrait photo. (DOWNLOAD)
  • Photoshop

Goal: Using photoshop, recreate your second paper collage composition.

PREP:

  • Download your hi-res portrait photo. (DOWNLOAD)
  • Open your photo-portrait file in Photoshop.
  • Create a new file: Size: 12″ wide x9″ high, Resolution: 300 pixels per inch, Color Mode: grayscale.
  • Save your file with your first initial and last name and the project title:
    For example: jsmith_value_added.psd

PROCESS:

  • Use your Narrow-Range collage as a guide.
  • Set the Move tool (V) options to Auto Select > Layer.
  • Use the Rectangle Marque tool (M):
    • select portions of your original photo portrait and copy and paste them into the new document to recreate the paper collage.
  • Use the Move tool (V) and click on the pasted objects in your collage to quickly select and rearrange your “collage” pieces. This also selects them in the Layers palette and allows you to manipulate them.
  • Use the Transform Tool (Command + T) to rotate your “collage” pieces. Add in the Shift Key to restrain the rotation to 90 degrees.
  • Hold down the Option Key while dragging with the Move Tool to create quick copies of a selected layer/object.
  • DO NOT USE OTHER FILTERS, COLOR, OR ANY OTHER TRANSFORMATION TECHNIQUES, besides transform, flip, rotate, or mirror.
  • If you are familiar with Photoshop, feel free to use more advanced techniques, as long as they keep within the guidelines of the project description.
  • Save frequently!

SUBMISSION:

  • Print and mount your digital collage print to a piece of bristol.
  • Save another version as JPG 72dpi, as demonstrated in class for upload to the class blog.
  • Print out (5) b/w laser prints of your finished digital collage and bring to class for a group collage!

LABS:

If necessary, use one of the following labs to complete and print your digital composition:

Work Time

  • Digital Paintings in photoshop

Homework

Supplies Needed for Color Painting!

Class 19 | Collage Crit & Painting

November 5, 2018

What’s Due?

  1. Phase 2: Define: Completed Collages (Narrow and Broad) using your portrait printouts. Post to the FYLC site, see guidelines.
  2. Come ready to work on your paintings.

Materials Needed:

  • You will need paint materials for this class.
    NOTE: Do not order online. Go to Blick or other art supply store. Do not buy expensive, professional-grade materials.
    • white and black gouache paints
    • student grade, sable-type watercolor brushes (do not buy brushes for acrylic or oil)
      • FLAT:  1/2″ angle, #4
      • ROUND: #1, #5  (or similar)
      • or a pack of brushes like this one
    • two water containers (yogurt cups, soda bottles with tops cut off, soup cans)
    • palette (round 10-well)
    • cotton rags (old white t-shirts or scraps)
    • Sketchbook, pencils, eraser, drafting tape
    • bristol

Critique

Students will present completed (2) 9″x12″ collages to the class.

  • (1) Narrow Value Range: either high-key or low-key
    OR
  • (1) Broad Value Range

Do the compositions presented follow the guidelines?

Copy the following questions into your sketchbook:

  • Is there a clear FOCAL POINT emphasized through the use of CONTRAST and changes in VALUE?
  • Is VISUAL HIERARCHY used to direct the viewer to the FOCAL POINT? How?
  • Is the entire compositional space (9″x12″ bristol) filled with collage pieces?
  • Is there a stable figure-ground relationship?
  • Does the composition follow the rule of thirds?
  • Is the value range, narrow (high or low) or broad?
  • Does it convey a certain mood? What?
  • Is the work clean, neat, and thoughtfully presented?

Demo

Painting Prep:

  • Take a photo of  your finished collages.
  • On a larger piece of paper (taken from the back of the room) outline the size of your collage (9″x12″) and divide the rectangle into nine even rectangles, like the rule of thirds. Extend these marks out from the rectangle about an inch.
  • Temporarily mount your collage on the larger piece of paper. Put some tape on the back of your collage to secure it.
  • Create a viewfinder frame, so that you only see one area at a time while you are working.
  • Keep everything clean and neat.

Broad-Range Painting:

  1. With your collage as a visual reference, you will be using a viewfinder and grid to help paint each area in isolation (independently) from its neighbor.
  2. Use the viewfinder frame and the rule of thirds grid surrounding your collage to isolate each of the nine rectangles.
  3. Recreate (in gouache paint) each gridded area of your composition using a range of black, white, and gray values- achieving continuous tone in areas where highlight and shadow blend together. Use your Value Scale as a guide.
  4. Painting Tips:
    • Do not worry about accurately rendering an eye, nose or ear, see/think only in terms of value and the boundaries of each value relationship.
    • Notice how some values crossover shape boundaries into adjoining areas (open-value), while others are limited by the edges of the shape (closed-value).
    • Remember to work on each rectangle independently and protect your finished painting with tracing paper as you work. Gouache is very delicate and can easily pick up the dirt and oils from your hands.
    • Mix a very small amount of water thoroughly into the paint, for each value you create. The consistency should be like whole milk or cream. Before you apply paint to paper make sure it’s completely mixed in the palette to produce a flat consistent appearance. We want flat, blocks of paint with few streaks or brush marks.
    • Keep two containers of water, use 1 for washing your brushes and 1 for adding water to paint.
    • Wash your brush after each value is mixed and applied.
    • Use a paper towel or rag to get excess paint and water off the brush before mixing a new value.
  5. When you have completed your composition carefully protect all elements with a piece of clean tracing paper and cardboard.

Homework

Due next class:

  • Finished painting

Materials needed:

  • Thumb drive with your original portrait
  • Come prepared to complete a digital collage in photoshop.

Class 18 | Project #3 Collage Lab

November 1, 2018

What’s DUE?

  • 1 collage should be completed or near completion. We will work in class to refine and complete both collage compositions.
  • Come prepared to work. Bring the following:
    • Sketchbook, 9×12″ Bristol, pencils, eraser, knife/scissors, drafting tape, glue

Discussion

LAB: Project #3

  • Complete Phase 2: Define
  • By the end of class you should have completed both collages (broad and narrow value range).

DEMO

  • Gluing down your collage pieces

Homework

  • Complete both collages before next class.
  • This means you’ve glued them down as demonstrated in class today.
  • We will be painting next class! Make sure you have the following supplies.

Materials Needed:

You will need paint materials for next class. Do not order online. Go to Blick or other art supply store. Do not buy expensive, profession-grade materials.

  • white and black gouache paints
  • sable-type watercolor brushes (do not buy brushes for acrylic or oil)
    • FLAT:  1/2″ angle, #4
    • ROUND: #1, #5
    • or a pack of brushes like this one
  • two water containers (yogurt cups, soda bottles with tops cut off, soup cans)
  • palette (round 10-well)
  • cotton rags (old white t-shirts or scraps)
  • Sketchbook, pencils, eraser, drafting tape, bristol


Class 17 | Collage + Rule of Thirds

October 29th, 2018

What’s DUE?

  1. VALUE RANGE RESEARCH: Post your paragraphs and 3 final images (broad, narrow high key and narrow low key) to the class blog.
  2. VALUE SCALE RESEARCH: Finish the exercise we started in class and bring it to class.
  3. Project #2: Phase 4 Deliver Post should be posted!

Materials needed:

  • Download and PRINTOUT 5 laser prints of your image from this link (DOWNLOAD)
    NOTE: if you didn’t get your photograph taken, choose someone else’s portrait to print.
  • sketchbook, 9×12″ Bristol, pencils, eraser, knife/scissors, ruler/T-square, drafting tape.

Discussion:

Cubism and Portraits

Vocabulary review from last class:

  • Elements: Value
  • Principles: Emphasis, Focal Point, Contrast

New: 

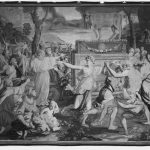
  • Closed-ValueValues are limited by the boundaries of shapes and clearly isolate individual parts of the composition. This type of composition could create dramatic mood through contrasting values.
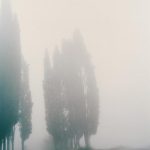
  • Open-Value: Values cross shape boundaries, integrating parts with adjoining areas and unifying the composition. This type of composition could create a mysterious fog or haze using closely related values.
  • Rule of Thirds: The rule of thirds divides a composition into nine equal parts by two equally spaced horizontal lines and two equally spaced vertical lines. It is considered a compositional rule of thumb. The theory is that if you place points of interest in the intersections or along the lines and avoid the middle square that your composition is more balanced.
  • Proportion: Relationship between parts of a whole or related units. (such as a the human body, or picture plane)
  • Scale: Associations of size, related to a constant size, unit of measure, or relative whole.
  • Movement: creates action and leads the viewer’s eye through a composition.

Lab: Project #3

Create (2) collage compositions, each on 9×12″ bristol, that use CONTRAST, changes in VALUE, and VISUAL HIERARCHY to direct the viewer to a clear FOCAL POINT.

  • Use the printouts of the portraits taken in class (DOWNLOAD HERE)
  • Cut apart your portrait into one or more types of shapes: squares, rectangles, triangles, diamonds… Use as many copies of the portrait as you need!
  • Rearrange and experiment with your portrait pieces to create (2) new Cubist-style portraits.
    • (1) Narrow Value Range: either high-key or low-key
    • (1) Broad Value Range
  • In each composition:
    • Consider both the figure and the ground. Your background (ground) should support the portrait (figure).
    • Create a Focal Point wherein one area or element is Emphasized through Contrast in Scale and Value.
    • Use Visual Hierarchy to clearly direct the viewer’s eye to the focal point.
    • Use Value steps from light to dark to support transitions from one compositional element to another.
    • Your composition could be closed-value or an open-value .
    • Fill the entire compositional space (9″x12″) with collage pieces, even if your background is primarily white, black, gray or a gradation from light to dark.
    • Position each piece in your collage composition and use a small bit of tape on the back of each piece to adhere your pieces to the bristol.
  • DO NOT GLUE YET!
    • Have the Professor review your work before continuing.
    • Take a photo of your finished and approved collages, just for future reference.
  • NEXT
    • Once approved, carefully glue your collage pieces to the bristol, taking care not to get glue on the front. Use a wet paper towel or rag to keep your hands clean, and a piece of tracing paper to smooth out the glued collage pieces.
    • Keep everything clean and neat.

Homework/Supplies

  1. Complete 1 collage before next class. We will work in class to refine and complete our collage compositions.
  2. Come prepared to work. Bring the following:
    • Sketchbook, 9×12″ Bristol, pencils, eraser, knife/scissors, drafting tape, glue

Class 16 | Critique & Project 3

October 25, 2018

What’s DUE?

  • Field Trip Reflection:
    • Create a post on the Class Blog about the New Lab field trip
    • Post Title: Field Trip to New Lab
    • Post Content: Choose one new thing that you learned on this field trip. Note the details. Is there anything about this experience that surprised you or made you think or feel differently? Include any images, with caption.
    • Post Category: Field Trip
    • Comment: On at lease 1 other student’s Field Trip post.
  • Project #2 is due!
    • Add your Phase 3 post to the Class Site. We will have critique on Thursday to review your animation work.

Materials needed:

  • Sketchbook, 9×12″ Bristol, pencils, eraser, knife/scissors, ruler/T-square, drafting tape.

Peer Critique

  • Review the guidelines and vocabulary for Project #2.
  • Review all Animated Mashups from the class blog.
  • Choose 2 posts with the least number of comments and provide feedback to each.
  • These should be full, thoughtful critiques of your peer’s good effort. Be thorough and helpful. If you have ideas about how the work can be improved, share them!

Discussion

The Elements: basic components used as part of any composition, independent of the medium.

  • Value: Signifies the relative differences of light and dark
    • Achromatic: Value with the absence of hue (color) and saturation (intensity).
    • Chromatic: Value demonstrated by a given hue.
    • Grayscale: The full range of values simplified into a graduated scale.
    • Low-Key: When the values of an image are predominately dark
    • High-Key: When the values of an image are predominately light
    • Narrow Range: When the values congregate around the dark, middle, or light part of the grayscale.
    • Broad Range: When the values are spread over the dark, middle, or light part of the grayscale.
    • Shadow: Dark area of an object as a result of a disruption of the light source.
    • Highlight: Portion of an object that receives the greatest amount of direct light
    • Chiaroscuro/Tenebrism: Forceful use of contrasting lights and darks, creating a dramatic mood.

The Principles: basic assumptions that guide the design practice.

  • Emphasis: The special attention or importance given to one part of a composition. Emphasis can be achieved through placement, contrast, size, etc.
    • Dominance/Hierarchy: The expression of visual and conceptual order that communicates degrees of importance of the various parts of a composition. This can also be achieved through placement, contrast, size, etc.
    • Focal Point: The elements or objects on which the viewer’s attention is focused.
  • Contrast: Occurs when elements are unrelated or dissimilar in value, size, shape, etc. Increasing contrasts can create dominance.

References:

LAB

Value Range Research: HANDS

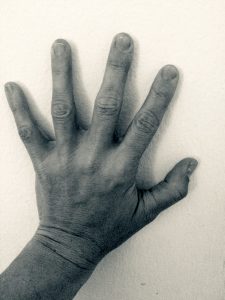
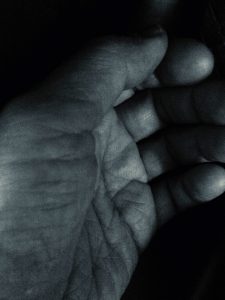
  1. Using your camera or camera phone*, compose 3 photographs of your hands with the following qualities:
    • (1) predominately within the high-key / light value range
    • (1) predominately within the low-key / dark value range
    • (1) broad value range – spread over the dark, middle, or light parts of the grayscale.
  2. If you have the ability to shoot in grayscale or with a silvertone or noir filter, please do.
  3. Designate a new section of your sketchbook and write ‘Value-Added Portraits’.
  4. Compose a minimum 2-paragraph description, with specific references to the images, indicating how the key sets the mood of the composition. Also notice and report how the forms in the composition create highlight and shadow relationships; some may be abrupt, others may have a gradation of value from light to dark. How does this contribute expressive quality (mystery, drama, success, joy, etc) of the compositions?

* If you don’t have a camera, please partner with another student who does.

Value Scale

Complete the Achromatic Value Scale using pencils

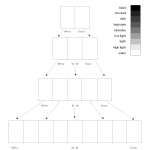
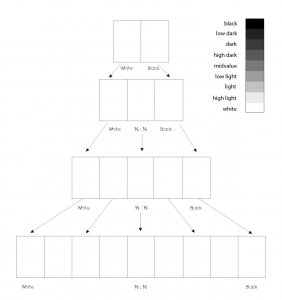
  • On the handout provided, create 4 scales starting with 2 steps and ending with 9 steps ranging from black to white in even, progressive increments.
  • Your 9-step value scale should have black, low dark, dark, high dark, mid-value, low light, high light, and white.
Achromatic Value Scale

Achromatic Value Scale

Homework

Complete the following before next class:

VALUE RANGE RESEARCH:

  • Create a new blog post called Value-Added Portraits: Phase 1.
  • Refine your writing and add it to your post.
  • Add a gallery with your 3 images. Don’t forget to caption them High Key – Narrow Value Range, Low Key- Narrow Value Range, and Broad Value Range
  • Include the hours that you worked on this part of the project.
  • Comment on at least 1 other student’s posts.

PROJECT #2

  • Finish Phase 4: Deliver for Project #2.  If you don’t post Phase 4: Deliver, you will not receive a grade for the project.

Materials needed:

  • Download and PRINTOUT 5 laser prints of your portrait ((DOWNLOAD HERE))
    • IMPORTANT NOTE: If you missed this class and didn’t get your photograph taken, contact the professor BEFORE THE NEXT CLASS.
  • Bring: Sketchbook, 9×12″ Bristol, pencils, eraser, knife/scissors, ruler/T-square, drafting tape.

Class 15 | Field Trip to New Lab!

October 22, 2018

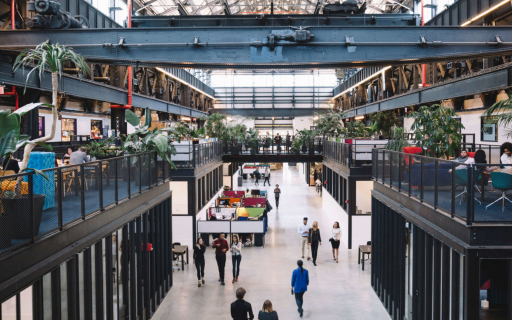
Field Trip to NEW LAB!

New Lab

New Lab

WHEN: Monday, October 22, 2018 (Meet in ENG1101 – 1pm)

WHERE: New Lab
19 Morris Avenue
(Entrance at Cumberland St & Flushing Ave)
Brooklyn, NY 11205

  • Directions:
    Walk from Jay Street or take the B57 or the B69 to Cumberland Street and Flushing Avenue.
    Continue to the Cumberland Gate.
    View Directions from City Tech

WHAT:
New Lab is a workspace for designers, technologists, and entrepreneurs working in advanced technology—in disciplines including robotics, AI, connected devices, nanotechnology, urban tech, and more. With resident space, on-site Product Realization, specialized programming, and access to a network that includes city agencies, venture capitalists, domain experts, and leading corporations, New Lab makes innovation move faster. >>> MORE

Homework

  1. Field Trip Reflection:
    • Create a post on the Class Blog about this field trip and comment on 1 other student’s post.
    • Post Title: Field Trip to New Lab
    • Post Content: Choose one new thing that you learned on this field trip. Note the details. Is there anything about this experience that surprised you or made you think or feel differently? Include any images, with caption.
    • Post Category: Field Trip
    • Comment: On at lease 1 other student’s Field Trip post.
  2. Project #2 is due!
    • Post your Phase 3 post to the Class Site today. We will have critique on Thursday to review your animation work.
    • If you need help, see me during my office hour today, Monday 5-6pm in N1127 or N1122.

Class 14: Animation Audio & Export

October 18, 2017

What’s needed for this class:

DUE:

  1. Completed Animated Mashup.
    • Save your FirstInitalLastNameMashup.psd  file to your thumb drive and Dropbox or Google Drive.
    • Bring two songs to class (1) with Staccato rhythm and (1) with Legato rhythm.
    • We will finish the audio mashup in class!
  2. Glossument work
    • You should have at least 5 words visualized in your book
    • Bring your book to class to present for the Mid-Semester Critique!

Materials Needed:

  1. Access to two audio files to add to your mashup or use the files provided.
  2.  Dropbox or Google Drive account access to store your finished files
  3. Your Glossument Book

Glossument Mid-Semester Review

  • Place your Glossument books on the back table for review.
  • You will receive a mid-semester grade and evaluation on this project.

Lab: Sound & Export

Add sound and adjust your animation:

  • If you haven’t already done so, import two pieces of music, one with staccato rhythm and one with legato rhythm: Summertime and Another One Bites the Dust. Download these files or two of your own to your working folder. They must be in the same folder as your mashup file.
  • Import your first audio file into the existing audio track at the bottom of the timeline.
    • Click the little arrow next to the music note symbol and choose Add Audio.
  • Import your second audio file by adding a new audio track.
    • Click the little arrow next to the music note symbol and choose Add New Audio Track.
    • Scroll down to see the second audio track.
    • Click the little arrow next to the newly added audio track and choose Add Audio.
  • Your audio will be much longer than the rest of your 10 second animation.
  • Drag the audio layers to the left to hear different parts of each song.
  • If needed, adjust the work area to contain the animation in the Timeline panel.
  • Once you have found parts of each song that mashup nicely, move the play head to start and choose Split At Playhead from the dropdown in the timeline panel. Then move the playhead to the last frame and repeat. Delete the extra parts of the audio clips.
  • Control-click on the track to set the fade in and fade out for each song.
  • Additionally, you can adjust your animation to sync better with the audio.
  • We will do this together in class, but you can review using this tutorial.

Add start and end transitions

Add a fade transition to the start and end of each animation layer.

  • Click the black/white square at the top of the timeline.
  • Set the transition time to 1 second
  • Drag the Fade icon to the start and end of each layer
  • NOTE: do not add a transition to your white or black background layer

Exporting Your Animation for Web

  • Preview your animation and check the frame rate to make sure it’s 12 fps.
  • Set it to loop to make sure it loops seamlessly
    (Choose the gear icon in the Timeline panel tools and choose Loop Playback)
  • If needed, adjust the work area (the slider at the top of the animation panel) to contain the animation in the Timeline panel
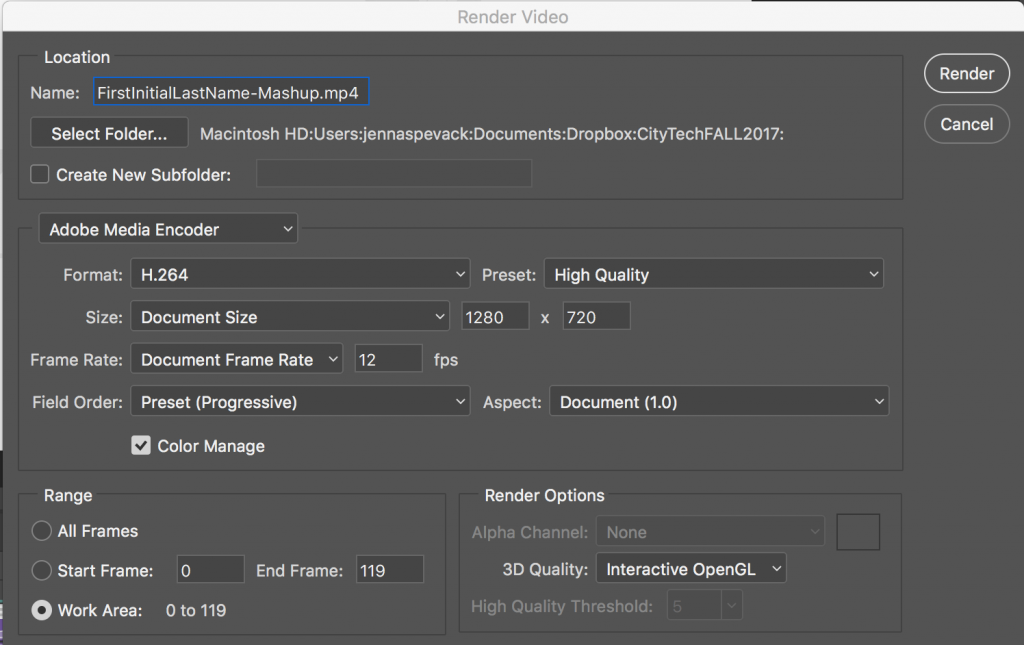
  • Choose File > Export > Render Video.
  • In the Render Video dialog box, enter a name for the video (firstinitiallastname-mashup).
  • Click the Select Folder button, and navigate to the location for the exported files.
    • To create a folder to contain your exported file, select the Create New Subfolder option and enter a name for the subfolder.
  • Choose Adobe Media Encoder from the menu below the Location section of the Render Video dialog box.
  • Format: H.264
  • Range: Work Area (Renders the frames selected by the work area bar in the Timeline panel)
  • Preset: High Quality
  • Size: Document Size
  • Frame Rate: Document Frame Rate (12fps)
  • Field Order: Progressive
  • Aspect: Document
  • Render Screenshot
  • Click Render. This will save an mp4 file to the folder you specified above.
  • Save your all your file(s) to Dropbox or GDrive or flash for backup.
  • Finally, upload your saved mp4 file to Dropbox or Google Drive and copy the link location.
  • Follow the demo presented in class or refer to this tutorial for help.

 Documentation and Feedback

  • Create a new blog post called Sound Visualizations: Phase 3.
  • Add a link to your mashup animation (on GDrive or Dropbox).
  • Write a short description of your animation.
  • Include the hours that you worked on this part of the project.
  • Don’t forget to comment on at least 1 other student’s posts. These should be full, thoughtful critiques of your peer’s good effort. Be thoughtful and helpful. If you have ideas about how the work can be improved, share them!

Homework

  1. All parts of Project #2 are due! Post your final Phase 4 post to the Class Site.
  2. Field Trip to New Lab next class:
    • Monday, October 22, 2018 (Meet at school – 1pm)
    • New Lab
      19 Morris Avenue
      (Entrance at Cumberland St & Flushing Ave)
      Brooklyn, NY 11205
    • Directions:
      Walk from Jay Street or take the B57 or the B69 to Cumberland Street and Flushing Avenue. Continue to the Cumberland Gate. View Directions from City Tech
    • Design Studio Visit:
      New Lab is a workspace for designers, technologists, and entrepreneurs working in advanced technology—in disciplines including robotics, AI, connected devices, nanotechnology, urban tech, and more.With resident space, on-site Product Realization, specialized programming, and access to a network that includes city agencies, venture capitalists, domain experts, and leading corporations, New Lab makes innovation move faster.

Class 13 | Animation!

October 15, 2018

What’s due for this class?

  1. Completed Animated Mashup Prep
    • Using your scanned hi-res file found in the Dropbox folder or if you own scan, Animated Mashup Prep in Photoshop should be complete. (Follow notes from class demo, class outline and homework)
    • Save to your Dropbox and/or portable drive.
  2. Materials needed:
    • Flash/jump drive and/or access to Dropbox/Google Drive with your prepped image files.
    • We will animate and add audio to your digital mashup file today. Come prepared to work.

Discussion- Animation

Norm McClaren

Lab / Demo

Animation Prep in Photoshop (RECAP):

  • Following the method we walked through in class, complete the following….
  • From the folder you created, FirstInitalLastNameMashup, open your scan in Photoshop.
  • Rename it  FirstInitalLastNameMashupPrep.jpg and save it to the same folder.
  • Make the following adjustments:
    • Image > Image Size: 72 dpi, 1280 wide x “XXXX” high (the height will depend the size of your mashup scan)
    • Image > Mode > RGB Color
    • Image > Image Rotation 90deg (horizontal/landscape), if needed.
  • SAVE AGAIN (Make sure you don’t save over your original hi-res file!!!)
  • Create a new file in Photoshop:
    • File > New
    • Image Preset (HDV/HDTV720) / Image size: 72dpi, 1280 wide x 720 high
    • Color Mode: RGB
  • Save the file FirstInitalLastNameMashup.psd to your project folder.
  • Select All > Copy your FirstInitalLastNameMashupPrep.jpg and Paste into your new file, FirstInitalLastNameMashup.psd
  • With the pasted layer selected, press Command+T (Edit > Free Transform).
    • A bounding box will appear around your image.
    • Grab the lower right square and hold down the Shift key (to restrain proportions) while dragging toward the center of the box.
    • Drag until the bottom of the image lines up with the bottom of the Canvas.
  • Save your file.
  • Next complete the same procedure we practiced in class. Divide up your mashup image into individual square layers.
  • Using the rectangle marquee tool “copy” (Command+C) and “paste in place” (Command+Shift+V) each pattern square on a new layer for use in your animation.

Animation in Photoshop:

Guidelines:

  • Create a short animation in Photoshop using your Animated Mashup Prep file.
  • Animate your pattern squares using keyframes to animate layer properties.
  • Minimum length: 5-10 second loop
  • Your animation should start and/or end with your mashup composition or a blank screen.
  • Add audio by mashing up snippets from two songs: (1) with Staccato rhythm and (1) with Legato rhythm.  Use Summertime and Another One Bites the Dust, if you wish or two songs of your own. The TWO  songs you choose should demonstrate, very clearly, these two rhythms and snippets of each should blend together seamlessly.
  • Submit your file as a PSD and export as MP4 video file to turn in on due date.

Steps to get set up:

  1. Open the file FirstInitalLastNameMashup.psd
  2. In the Layers window, select each layer that you created in the Mashup Prep section last class and convert each to a Smart Object.
    • Layer > Smart Objects > Convert to Smart Object
    • Watch this video to learn about converting to Smart Objects and animating with transform properties.
  3. Create a new layer below all your layers (drag it to the bottom) and fill it with white.
    • Edit Menu > Fill > Contents = White
    • Press the lock button to lock this layer
  4. Choose Window > Timeline. Press Create Video Timeline button.
  5. Adjust the frame rate to 12fps (frames per second)
    • Click on the upper-right corner of the Timeline window.
    • Choose Set Timeline Frame Rate
    • Type 12 in the box
  6. Adjust the length of the timeline to 10 seconds (ie: how long your animation will be)
    • Select the first purple layer in the timeline and drag the end of it out until it reads 10:00 seconds.
    • Do this for all your layers.
    • Press the play button and observe about how long your animation will be.
  7. Import your audio files into the audio tracks at the bottom of the timeline.
    • Your audio will be much longer than the rest of your 10 second animation, so you will need to drag the end of the green layers so that they fits within the length of your animation.
    • You can still drag and resize the audio layers to hear different parts of each song.
    • NOTE: if you want your animation to sync with your audio mashup, create the audio first and then create your animation.
  8. SAVE!
  9. Take a few minutes to draw out a storyboard.
    • How will your animation start? Are all squares assembled on stage or does it start with a blank screen?
    • Will there be a climax before all squares assemble or leave the stage?
    • How will you use the staccato and legato rhythms?

Animating:

  1. Use keyframes to animate layer properties to animate your pattern squares.
  2. Animate layer properties: Position and Opacity (please avoid animating the Style property). To animate a layer property, set at least two keyframes for that property.
    For example:
    • You can animate position by adding a keyframe to the Position property, then moving the current time indicator and dragging the layer in the document window.
    • You can animate a layer’s opacity by adding a keyframe to the Opacity property, then moving the current time indicator and changing the layer’s opacity in the Layers panel.
  3. Set tweening (interpolation) method: Linear or Hold
    • Linear keyframe: Evenly changes the animated property from one keyframe to another.
    • Hold keyframe: Maintains the current property setting. This interpolation method is useful for strobe effects, or when you want layers to appear or disappear suddenly.
    • To change methods, select one or more keyframes and right-click a selected keyframe and choose either Linear Interpolation or Hold Interpolation from the Context menu.
      OR open the panel menu and choose Keyframes > Linear or Hold.
  4. To start
    • Set position and opacity keyframes for each layer in the first and last frame.
    • This will allow your animation to loop seamlessly.
  5. Next:
    • Select the move tool in the left toolbar and make sure Auto Select > Layer is checked at the top.
    • Now drag the time marker to another location in the timeline and set another keyframe or use the move tool to move an object around the stage.
    • Continue adding keyframes and changing position and opacity. You may also use Transform to change the scale of an object.
  6. Save your FirstInitalLastNameMashup.psd  file to your thumb drive or Dropbox or Google Drive.
  7. We will work on this together in class.

Resources:

  • Review this animating in Photoshop tutorial to get a brief overview of the techniques we will be using.
  • Watch this video to learn about converting to Smart Objects and animating with transform properties.
  • Here’s another video with more detail about keyframe animation using transform properties.

Homework

  1. Complete your animation.
    • Save your FirstInitalLastNameMashup.psd  file to your thumb drive or Dropbox or Google Drive.
    • Bring two songs to class (1) with Staccato rhythm and (1) with Legato rhythm.
    • We will finish the audio mashup in class!
  2. Glossument work
    • You should have at least 5 words visualized in your book
    • Bring your book to class to present for the Mid-Semester Critique!

Class 12 | Crit & Mashup Animation Prep

October 11, 2017

What’s due for this class?

  1. Final inked version of your Pattern Mashup on a piece of 9″x12″ bristol board, based on your finalized preparatory compositions. Come prepared to present your work!
  2. Post to the blog, Sound Visualizations: Phase 2
  3. Your Glossument Book with at least (2) glossary words visualized in the graphic style of your choosing.
  4. Materials needed: Flash/jump drive and/or access to Dropbox/Google Drive

Glossument Check-in (15 minutes)

  • Present your Glossument Book with at least (2) glossary words visualized in the graphic style of your choosing.
  • Next Thursday is our mid-semester milestone!

Peer Critique

In groups of 3, present your finished inked mashups.

  • Present and analyze your finished work in terms of concept, craft, what you learned, and the design process.
  • State your name, your understanding of the project goals (ie: what is the point?), which parts are successful and which parts need more work.
  • When critiquing other student’s work, clearly describe what works and what doesn’t work using the project vocabulary: Line, Rhythm, Repetition, Variety, Pattern, Unity, Grid, Rule of Thirds, Economy
  • Write down your feedback in your notebook and then refine it in a comment.
  • Work together to get your Sound Visualizations: Phase 2 work posted and peer critique comments posted

Lab: Scanning and preparing digital files

SCAN:

  1. Create a folder on your drive called FirstInitalLastNameMashup.
  2. Scan your finished inked Pattern Mashup (300dpi, grayscale, jpg).
  3. Save/rename this hi-res file FirstInitalLastNameMashupHIRES.jpg to the folder you just created.
  4. If  you completed and submitted your completed Inked Mashup in class, find your scan HERE.

DEMO PREP in Photoshop:

Your Mashup Prep in Photoshop:

  • Following the method we walked through in class, complete the following….
  • From the folder you created earlier, FirstInitalLastNameMashup, open your scan in Photoshop.
  • Rename it  FirstInitalLastNameMashupPrep.jpg and save it to the same folder.
  • Make the following adjustments:
    • Image > Image Size: 72 dpi, 1280 wide x “XXXX” high (the height will depend the size of your mashup scan)
    • Image > Mode > RGB Color
    • Image > Image Rotation 90deg (horizontal/landscape), if needed.
  • SAVE AGAIN (Make sure you don’t save over your original hi-res file!!!)
  • Create a new file in Photoshop:
    • File > New
    • Image Preset (HDV/HDTV720) / Image size: 72dpi, 1280 wide x 720 high
    • Color Mode: RGB
  • Save the file FirstInitalLastNameMashup.psd to your project folder.
  • Select All > Copy your FirstInitalLastNameMashupPrep.jpg and Paste into your new file, FirstInitalLastNameMashup.psd
  • With the pasted layer selected, press Command+T (Edit > Free Transform).
    • A bounding box will appear around your image.
    • Grab the lower right square and hold down the Shift key (to restrain proportions) while dragging toward the center of the box.
    • Drag until the bottom of the image lines up with the bottom of the Canvas.
  • Save your file.
  • Next complete the same procedure we practiced in class. Divide up your mashup image into individual square layers.
  • Using the rectangle marquee tool “copy” (Command+C) and “paste in place” (Command+Shift+V) each pattern square on a new layer for use in your animation.

Homework

  1. Complete Animated Mashup Prep
    • Find your scanned hi-res file for animation in this Dropbox folder.
      NOTE:
      If you didn’t turn in your mashup, plan to have it scanned at 300dpi at FedEx/Kinkos, Staples or any copy center with a good scanner. You can also scan at City Tech Computer Labs.
    • Complete PREP in Photoshop following notes from class demo and above.
    • Save to your Dropbox and/or portable drive.
  2. We will animate and add audio to your digital mashup file next class. Come prepared to work!
« Older posts Newer posts »
Scroll Up