Value-Added Portraits
Problem: Create unified achromatic gray compositions with defined visual hierarchy and a clear focal point, based on photographic portraits.
Limits: Use broad and narrow value ranges in high and low keys; use grid; change scale and orientation
Materials: Sketchbook, pencils, Bristol Board 9×12″, gouache paints, brushes, palette, rags, water container, scissors, exacto knife, ruler/t-square, glue, photoshop
Concepts: Value, grayscale, achromatic, emphasis, focal point, contrast, shadow, highlight, narrow value, broad value, high key, low key, open-value composition, closed-value composition, scale, visual hierarchy, movement, compositional flow.
Technical Skills: thumbnail sketching, painting techniques, draughmanship with ruler/t-square, exacto knife and collage, digital tools: rectangle marque, move, transform, modifier keys.
Material References:
- COMD1100 Class photographs for print ((DOWNLOAD HERE))
Design Process:
Phase 1: Discover
Value Range Research: Hand Portraits
- Using your camera or camera phone*, compose 3 photographs of your hands with the following qualities:
- (1) predominately within the high-key / light value range
- (1) predominately within the low-key / dark value range
- (1) broad value range – spread over the dark, middle, or light parts of the grayscale.
- If you have the ability to shoot in grayscale or with a silvertone or noir filter, please do.
- Designate a new section of your sketchbook and write ‘Value-Added Portraits’.
- Compose a minimum 2-paragraph description, with specific references to the images, indicating how the key sets the mood of the composition. Also notice and report how the forms in the composition create highlight and shadow relationships; some may be abrupt, others may have a gradation of value from light to dark. How does this contribute expressive quality (mystery, drama, success, joy, etc) of the compositions?
* If you don’t have a camera, please partner with another student who does.
Value Scale Research
Complete the Achromatic Value Scale using pencils.
- On the handout provided, create 4 scales starting with 2 steps and ending with 9 steps ranging from black to white in even, progressive increments.
- Label (in good handwriting) your 9-step value scale with black, low dark, dark, high dark, mid-value, low light, high light, white.

Documentation and Feedback
- Create a new blog post called Value-Added Portraits: Phase 1.
- Refine your writing and add it to your post.
- Add a gallery with your 3 images. Don’t forget to caption them:
- High Key – Narrow Value Range
- Low Key- Narrow Value Range
- Broad Value Range
- Include the hours that you worked on this part of the project.
- Comment on at least 1 other student’s posts.
Phase 2: Define
Goal: Create (2) collage compositions, each on 9×12″ bristol, that use CONTRAST and changes in VALUE to direct the viewer to a clear FOCAL POINT. Use VISUAL HIERARCHY to direct the viewer’s eye to the focal point.
Collages:
Create (2) collage compositions, each on 9×12″ bristol, that use CONTRAST, changes in VALUE, and VISUAL HIERARCHY to direct the viewer to a clear FOCAL POINT.
- Use the printouts of the portraits taken in class (DOWNLOAD HERE)
- Cut apart your portrait into one or more types of shapes: squares, rectangles, triangles, diamonds… Use as many copies of the portrait as you need!
- Rearrange and experiment with your portrait pieces to create (2) new Cubist-style portraits.
- (1) Narrow Value Range: either high-key or low-key
- (1) Broad Value Range
- In each composition:
- Consider both the figure and the ground. Your background (ground) should support the portrait (figure).
- Create a Focal Point wherein one area or element is Emphasized through Contrast in Scale and Value.
- Use Visual Hierarchy to clearly direct the viewer’s eye to the focal point.
- Use Value steps from light to dark to support transitions from one compositional element to another.
- Your composition could be closed-value or an open-value .
- Fill the entire compositional space (9″x12″) with collage pieces, even if your background is primarily white, black, gray or a gradation from light to dark.
- Position each piece in your collage composition and use a small bit of tape on the back of each piece to adhere your pieces to the bristol.
- DO NOT GLUE YET!
- Have the Professor review your work before continuing.
- Take a photo of your finished and approved collages, just for future reference.
- NEXT
- Once approved, carefully glue your collage pieces to the bristol, taking care not to get glue on the front. Use a wet paper towel or rag to keep your hands clean, and a piece of tracing paper to smooth out the glued collage pieces.
- Keep everything clean and neat.
Documentation and Feedback
- Create a new blog post called Value-Added Portraits: Phase 2.
- Add images of your 2 collages. Don’t forget to caption them Broad Value Range or Narrow Value Range (high-key or low-key).
- Write a brief description of your work and add it to the post.
- Include the hours that you worked on this part of the project.
- Don’t forget to comment on at least 1 other student’s posts.
Phase 3: Develop
Broad-Range Painting
Recreate your broad-range paper collage composition in paint.
Painting Prep:
- Take a photo of your finished collages.
- On a larger piece of paper (taken from the back of the room) outline the size of your collage (9″x12″) and divide the rectangle into nine even rectangles, like the rule of thirds. Extend these marks out from the rectangle about an inch.
- Temporarily mount your collage on the larger piece of paper. Put some tape on the back of your collage to secure it.
- Create a viewfinder frame, so that you only see one area at a time while you are working.
- Keep everything clean and neat.
Painting:
- With your collage as a visual reference, you will be using a viewfinder and grid to help paint each area in isolation (independently) from its neighbor.
- Use the viewfinder frame and the rule of thirds grid surrounding your collage to isolate each of the nine rectangles.
- Recreate (in gouache paint) each gridded area of your composition using a range of black, white, and gray values- achieving continuous tone in areas where highlight and shadow blend together. Use your Value Scale as a guide.
- Painting Tips:
- Do not worry about accurately rendering an eye, nose or ear, see/think only in terms of value and the boundaries of each value relationship.
- Notice how some values crossover shape boundaries into adjoining areas (open-value), while others are limited by the edges of the shape (closed-value).
- Remember to work on each rectangle independently and protect your finished painting with tracing paper as you work. Gouache is very delicate and can easily pick up the dirt and oils from your hands.
- Mix a very small amount of water thoroughly into the paint, for each value you create. The consistency should be like whole milk or cream. Before you apply paint to paper make sure it’s completely mixed in the palette to produce a flat consistent appearance. We want flat, blocks of paint with few streaks or brush marks.
- Keep two containers of water, use 1 for washing your brushes and 1 for adding water to paint.
- Wash your brush after each value is mixed and applied.
- Use a paper towel or rag to get excess paint and water off the brush before mixing a new value.
- When you have completed your composition carefully protect all elements with a piece of clean tracing paper and cardboard.
Narrow-Range Digital Collage
Using photoshop, recreate your narrow-range paper collage composition.
PREP:
- Download your hi-res portrait photo. (DOWNLOAD)
- Open your photo-portrait file in Photoshop.
- Create a new file: Size: 12″ wide x9″ high, Resolution: 300 pixels per inch, Color Mode: grayscale.
- Save your file with your first initial and last name and the project title:
For example: jsmith_value_added.psd
PROCESS:
- Use your Narrow-Range collage as a guide.
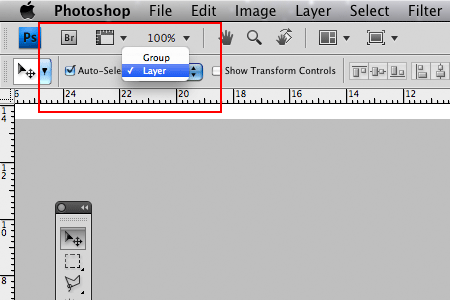
- Set the Move tool (V) options to Auto Select > Layer.
- Use the Rectangle Marque tool (M):
- select portions of your original photo portrait and copy and paste them into the new document to recreate the paper collage.
- Use the Move tool (V) and click on the pasted objects in your collage to quickly select and rearrange your “collage” pieces. This also selects them in the Layers palette and allows you to manipulate them.
- Use the Transform Tool (Command + T) to rotate your “collage” pieces. Add in the Shift Key to restrain the rotation to 90 degrees.
- Hold down the Option Key while dragging with the Move Tool to create quick copies of a selected layer/object.
- DO NOT USE OTHER FILTERS, COLOR, OR ANY OTHER TRANSFORMATION TECHNIQUES, besides transform, flip, rotate, or mirror.
- If you are familiar with Photoshop, feel free to use more advanced techniques, as long as they keep within the guidelines of the project description.
- Save frequently!
SUBMISSION:
- Print and mount your digital collage print to a piece of bristol.
- Save another version as JPG 72dpi, as demonstrated in class for upload to the class blog.
- Print out (5) b/w laser prints of your finished digital collage and bring to class for a group collage!
LABS:
- Use one of the following labs to complete and print your digital composition:
- Student Labs
General Building 600 - Learning Center Lab
Atrium Ground Floor (AG 18) - Additional Labs and Hours
- Student Labs
Documentation and Feedback
- Create a new blog post called Value-Added Portraits: Phase 3.
- Add a gallery with your finished compositions. (Don’t forget to captions!)
- Broad-Range Painting
- Broad-Range Collage
- Narrow-Range Digital Collage
- Narrow-Range Collage
- Include a sentence or two about the work you are presenting.
- Include the hours that you worked on this part of the project.
- Don’t forget to comment on at least 1 other student’s post.
Phase 4: Deliver
Critique
- Bring all parts of this project to class. Take a photo of the work displayed in the classroom.
- Be prepared to present, discuss and analyze your finished work in terms of concept, craft, what you learned, and the design process.
- State the following: your name, what you are presenting (title and design problem), which parts are successful and why, which parts are unsuccessful and why.
- Your peers and the professor will provide feedback. You will have an opportunity to revise your work based on the feedback and improve your grade.
Documentation and Feedback
- Create a new blog post called Value-Added Portraits: Phase 4 – Deliver.
- In the post, document your thoughts about this project. Think about what you learned, what you could have done better (planning, material use, craft), and how you will apply what you learned to your next project. Consider and respond to the comments made in class during the critique.
- Include links to your three other Design Process posts for this project. (ie: Phase 1: Discover, Phase 2: Define, Phase 3: Develop)
