October 18, 2017
What’s needed for this class:
DUE:
- Completed Animated Mashup.
- Save your FirstInitalLastNameMashup.psd file to your thumb drive and Dropbox or Google Drive.
- Bring two songs to class (1) with Staccato rhythm and (1) with Legato rhythm.
- We will finish the audio mashup in class!
- Glossument work
- You should have at least 5 words visualized in your book
- Bring your book to class to present for the Mid-Semester Critique!
Materials Needed:
- Access to two audio files to add to your mashup or use the files provided.
- Dropbox or Google Drive account access to store your finished files
- Your Glossument Book
Glossument Mid-Semester Review
- Place your Glossument books on the back table for review.
- You will receive a mid-semester grade and evaluation on this project.
Lab: Sound & Export
Add sound and adjust your animation:
- If you haven’t already done so, import two pieces of music, one with staccato rhythm and one with legato rhythm: Summertime and Another One Bites the Dust. Download these files or two of your own to your working folder. They must be in the same folder as your mashup file.
- Import your first audio file into the existing audio track at the bottom of the timeline.
- Click the little arrow next to the music note symbol and choose Add Audio.
- Import your second audio file by adding a new audio track.
- Click the little arrow next to the music note symbol and choose Add New Audio Track.
- Scroll down to see the second audio track.
- Click the little arrow next to the newly added audio track and choose Add Audio.
- Your audio will be much longer than the rest of your 10 second animation.
- Drag the audio layers to the left to hear different parts of each song.
- If needed, adjust the work area to contain the animation in the Timeline panel.
- Once you have found parts of each song that mashup nicely, move the play head to start and choose Split At Playhead from the dropdown in the timeline panel. Then move the playhead to the last frame and repeat. Delete the extra parts of the audio clips.
- Control-click on the track to set the fade in and fade out for each song.
- Additionally, you can adjust your animation to sync better with the audio.
- We will do this together in class, but you can review using this tutorial.
Add start and end transitions
Add a fade transition to the start and end of each animation layer.
- Click the black/white square at the top of the timeline.
- Set the transition time to 1 second
- Drag the Fade icon to the start and end of each layer
- NOTE: do not add a transition to your white or black background layer
Exporting Your Animation for Web
- Preview your animation and check the frame rate to make sure it’s 12 fps.
- Set it to loop to make sure it loops seamlessly
(Choose the gear icon in the Timeline panel tools and choose Loop Playback) - If needed, adjust the work area (the slider at the top of the animation panel) to contain the animation in the Timeline panel
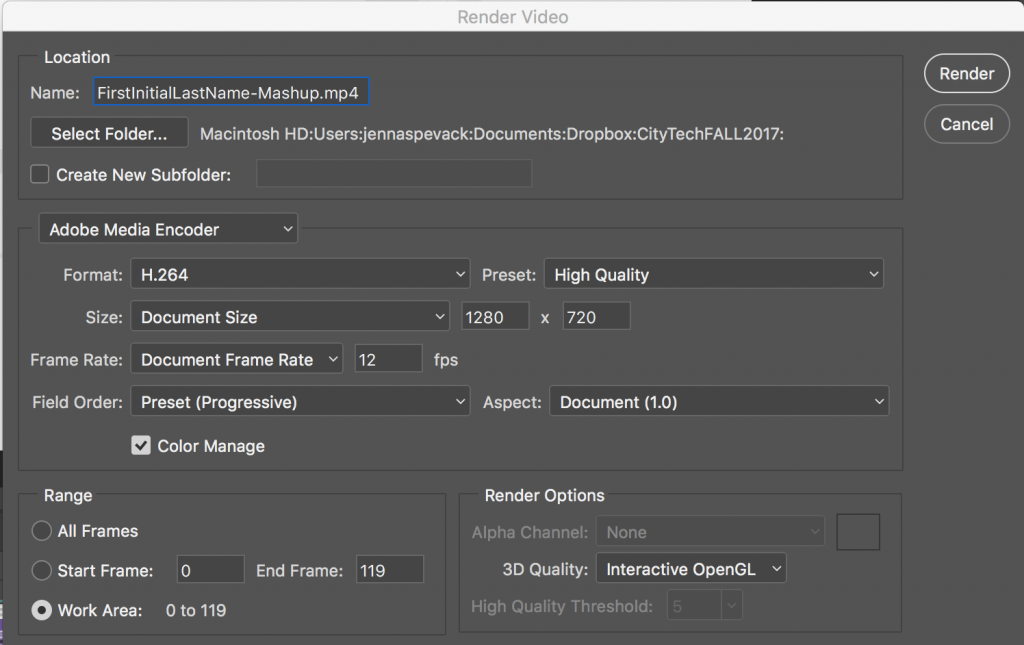
- Choose File > Export > Render Video.
- In the Render Video dialog box, enter a name for the video (firstinitiallastname-mashup).
- Click the Select Folder button, and navigate to the location for the exported files.
- To create a folder to contain your exported file, select the Create New Subfolder option and enter a name for the subfolder.
- Choose Adobe Media Encoder from the menu below the Location section of the Render Video dialog box.
- Format: H.264
- Range: Work Area (Renders the frames selected by the work area bar in the Timeline panel)
- Preset: High Quality
- Size: Document Size
- Frame Rate: Document Frame Rate (12fps)
- Field Order: Progressive
- Aspect: Document

- Click Render. This will save an mp4 file to the folder you specified above.
- Save your all your file(s) to Dropbox or GDrive or flash for backup.
- Finally, upload your saved mp4 file to Dropbox or Google Drive and copy the link location.
- Follow the demo presented in class or refer to this tutorial for help.
Documentation and Feedback
- Create a new blog post called Sound Visualizations: Phase 3.
- Add a link to your mashup animation (on GDrive or Dropbox).
- Write a short description of your animation.
- Include the hours that you worked on this part of the project.
- Don’t forget to comment on at least 1 other student’s posts. These should be full, thoughtful critiques of your peer’s good effort. Be thoughtful and helpful. If you have ideas about how the work can be improved, share them!
Homework
- All parts of Project #2 are due! Post your final Phase 4 post to the Class Site.
- Field Trip to New Lab next class:
- Monday, October 22, 2018 (Meet at school – 1pm)
- New Lab
19 Morris Avenue
(Entrance at Cumberland St & Flushing Ave)
Brooklyn, NY 11205 - Directions:
Walk from Jay Street or take the B57 or the B69 to Cumberland Street and Flushing Avenue. Continue to the Cumberland Gate. View Directions from City Tech - Design Studio Visit:
New Lab is a workspace for designers, technologists, and entrepreneurs working in advanced technology—in disciplines including robotics, AI, connected devices, nanotechnology, urban tech, and more.With resident space, on-site Product Realization, specialized programming, and access to a network that includes city agencies, venture capitalists, domain experts, and leading corporations, New Lab makes innovation move faster.
