2D Animation: AD540
COURSE CALENDAR | WEEK 07 CLASS OUTLINE | Homework
Topics Covered in Class:
- Review Walks (15 minutes)
- Discuss Midterm Project (15 minutes)
- Principles of Animation (1/2 hour)
- The Mechanics of a Walk
-- Part Two
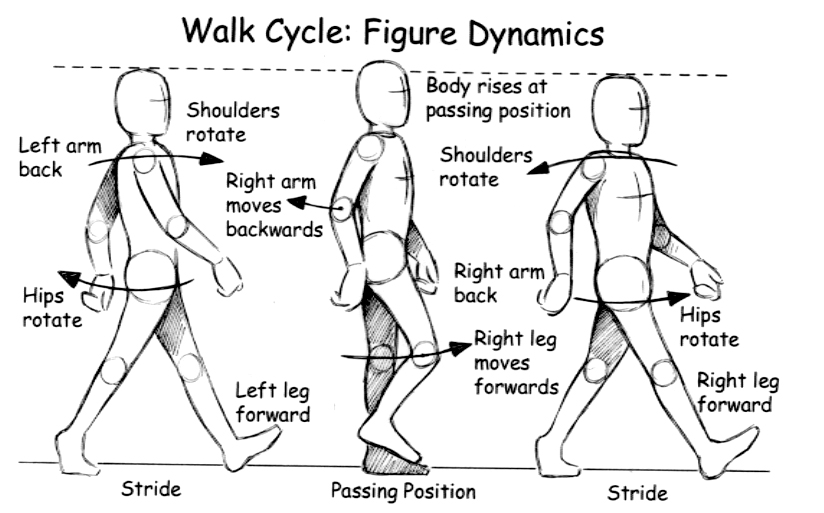
- Figure Dynamics: At the contact point of the stride, the shoulder rotates and arm swings in the opposite direction of the leading leg.
- Right leg forward = right arm and shoulder back, left arm and shoulder forward
- Left leg forward = left arm and shoulder back, right arm and shoulder forward
- Weight Shift
- Our weight shifts from one foot to the other in a normal stride.
- Each time we raise a foot it moves the weight of the body to the opposite side.
- Our shoulders and pelvis move to counteract the change in weight. The shoulders oppose the pelvis.
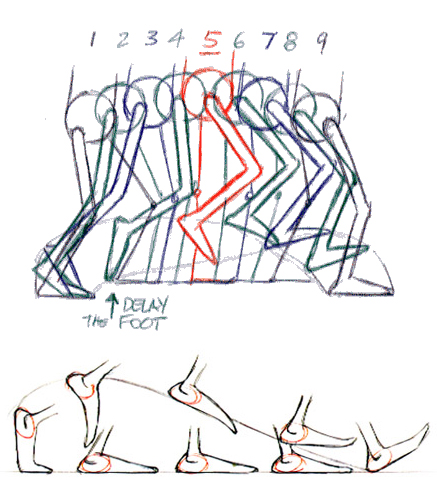
- The Action of the Foot and Timing
- Give more life the the walk by slowing out and slowing in the foot around the passing position.
- Delay the foot as it leaves the ground in the down position
- Exaggerate the lift and angle of the foot as it moves out of the passing position to into the up position.
- The heel follows the arc of action. The foot follows the heel. [Example
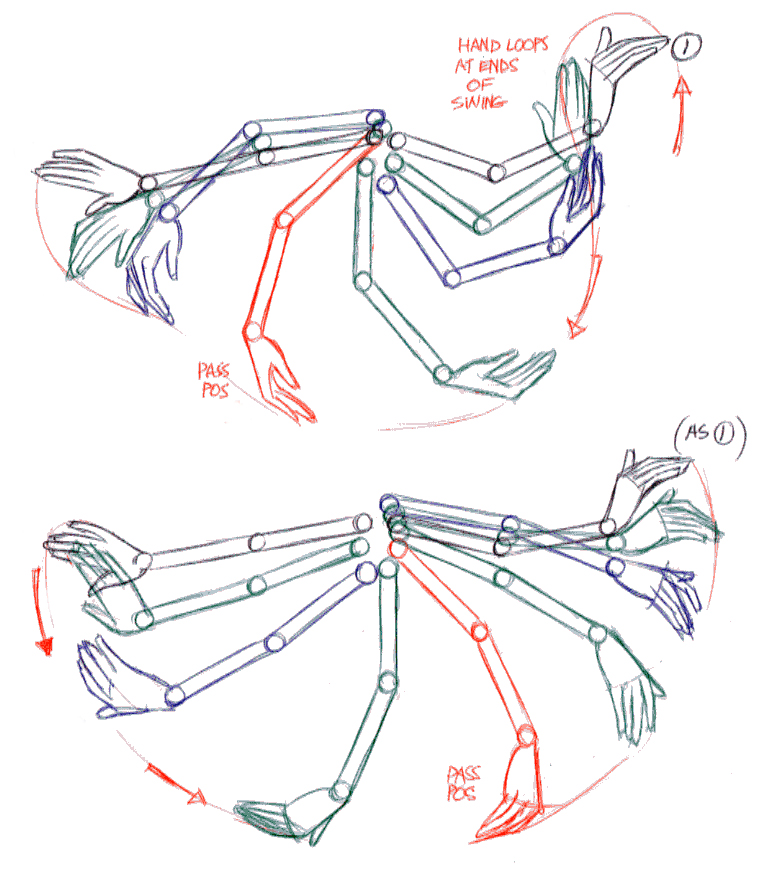
- Arm Movements: The arms swing in an arc, like a pendulum, to balance the thrust of the feet. Like the heel, the wrist maintains the arc of action. [Example].
- At the passing position the body rises, the shoulder drops, and the arm is at its lowest point in the arc.
- Animators have tricks for creating more interesting and natural arm swings.
- You can change the nature of the arm swing by changing or exaggerating the passing position. [Example]
- Arm movements can be broad and exaggerated or restrained, with little movement.
- To create flexibility in the arm swing, drag the hand [Example]
- "Break" the elbow joint. [Example]
- Use a different timings for your arms and leg
- Figure Dynamics: At the contact point of the stride, the shoulder rotates and arm swings in the opposite direction of the leading leg.
- The Mechanics of a Walk
-- Part Two
- Individual Meetings with Professor (during lab)
- Experiment - Walk Cycle Part Two: ARMS and CYCLE (2 1/2
hours)
- Today we will add the following to our Walk Animation
- Add the belt line to accentuate the change in weight.
- Create the arm movements.
- Add the inbetweens to our Walk
- Create a cycle.
- Open the file you started last week.
- Turn on the onion skinning.
- Add the belt line
- On each drawing add the belt line to show the change of weight.
- Belt line dips down on the contact positions and up on the passing positions.
- [Example]
- Add the arm swing
- You can create the arms on separate layer. This makes is possible to adjust a separate timing for the arms if you'd like.
- Start by creating arms for the first step (frames 1-9). The arm swing is like the pendulum, slowing out of the first key frame and slowing into the second.
- At the passing positions (frame 5) draw the arm with the shoulder in its lowest position, the arm hanging down, slightly bent and the hand dragging behind.
- Create 3 arcs for the arm swing guide
[Example]
- at the elbow
- at the top of the wrist
- at the finger tip
- Next draw the contact (1, 9) positions draw the arm swinging out in the opposite direction of the leading leg.
- To emphasis the squash of the down position (3) swing the arms out a little bit wider than the contact position. Bend the wrists here to their extreme rotation in the arc.
- Use this guide to draw the rest of your arm positions. Or this guide to create more exaggerated motion. Or create your own! Just make sure you maintain the stride and passing position for the arms.
- Create your In-Between drawings
- On the even frames of your animation create the inbetween drawings on the arms and legs element layers.
- Creating a Walk Cycle
- To create a walk cycle we will put each of the final drawings in one new document or layer, called WalkCycle. Each drawing will be lined up using the heel and toe as a guide. Follow this guide.
- Copy can paste your frames into a new layer. Remember that because frame 17 is the same drawing as frame 1, we won't need it for this cycle, however you might wait until your done to delete it.
- Reposition the drawings so that the toe of the grounded foot lines up with the grounded heel of the previous drawing. It should look as it the grounded foot is gliding along the ground.
- Today we will add the following to our Walk Animation
Please have the following prepared for the next class:
- Finish Part 2 of the Walk experiment
- Add the belt line to accentuate the change in weight.
- Create the arm movements.
- Add all the inbetweens to the legs and arms.
- Create a cycle
- Midterm Project DUE
- Review Midterm Project page for instruction
*Some images and video from Animators Survival Kit, Toon Institute and Brian Lemay