2D Animation: AD540
COURSE CALENDAR | WEEK 06 CLASS OUTLINE | Homework
Topics Covered in Class:
- Review Flag Cycles (15 minutes)
- Drop in Dropbox
- Discuss Midterm Project (15 minutes)
- Principles of Animation (1/2 hour)
- Types of Walks - Characters - Acting
- old, young, rich, poor, healthy, sick, happy, depressed, hopeful, sad, drunk?
- The type of walk tells a story about the character's emotional, physical, economic, etc. state of being.
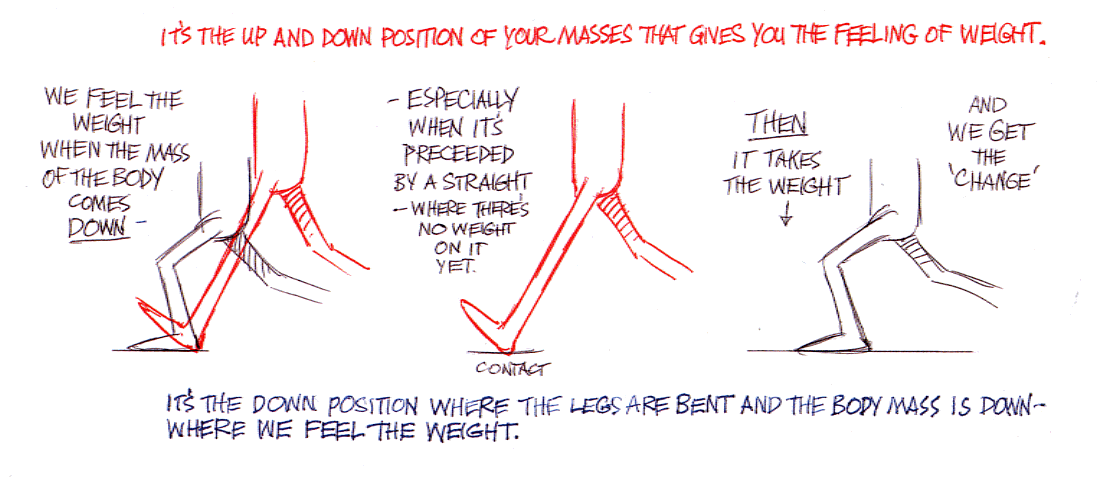
- Weight and Balance tells a lot about the character. The position of your center of gravity changes the feeling of weight and balance. The balance of a character may be determined by their mass, age, environment, or object they are carrying.
- Observe your neighbors walk. Count out the steps per second. Notice the movement of his/her head up and down. Ask your neighbor to balance a book on his/her head or walk with his/her legs wide apart or close together.
- The Mechanics of a Walk
- State of controlled balance
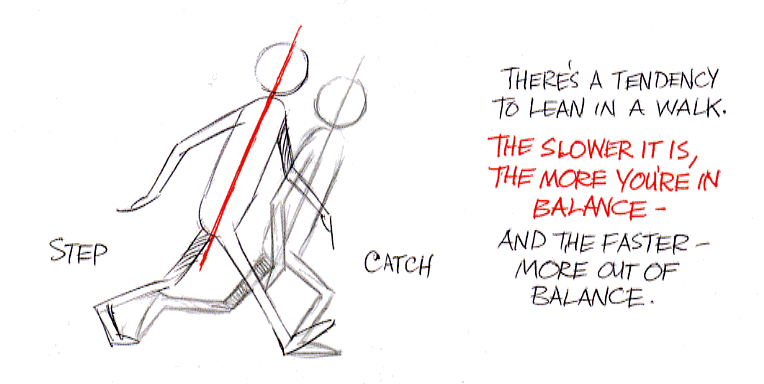
- Walking is akin to leaning forward and then catching yourself before you fall over.
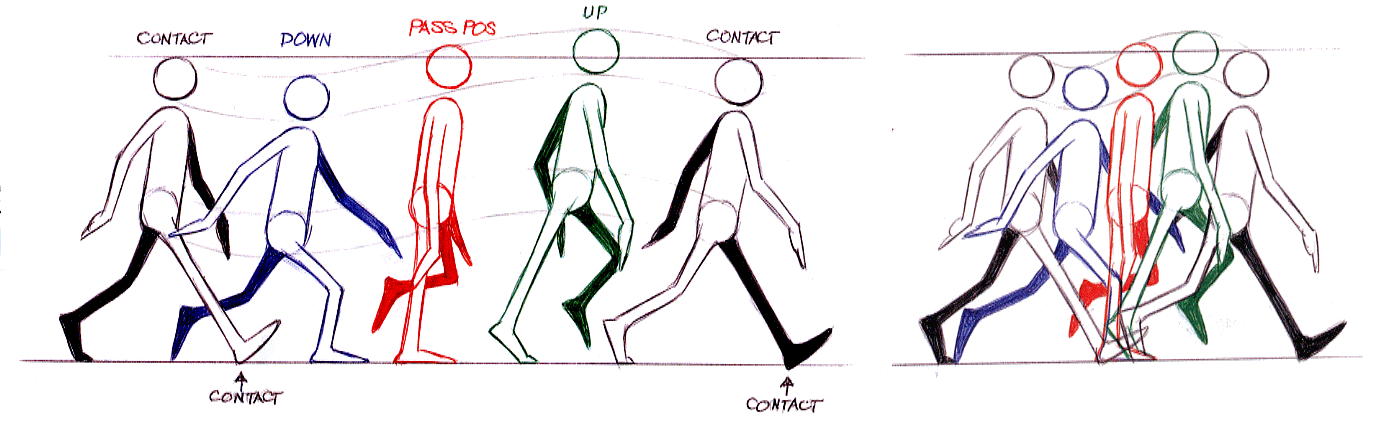
- The Four Parts of a Walk
- Contact Position (stride)
- Down Position (squash)
- Passing Position
- Up Position (stretch)
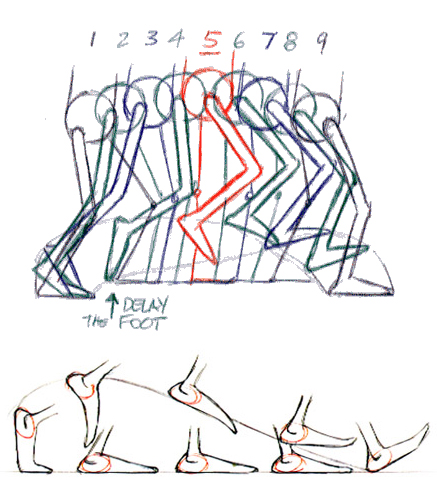
- The Action of the Foot
- Timing a Walk
- The tempo of a walk can be based on the characters mood, personality, and mass.
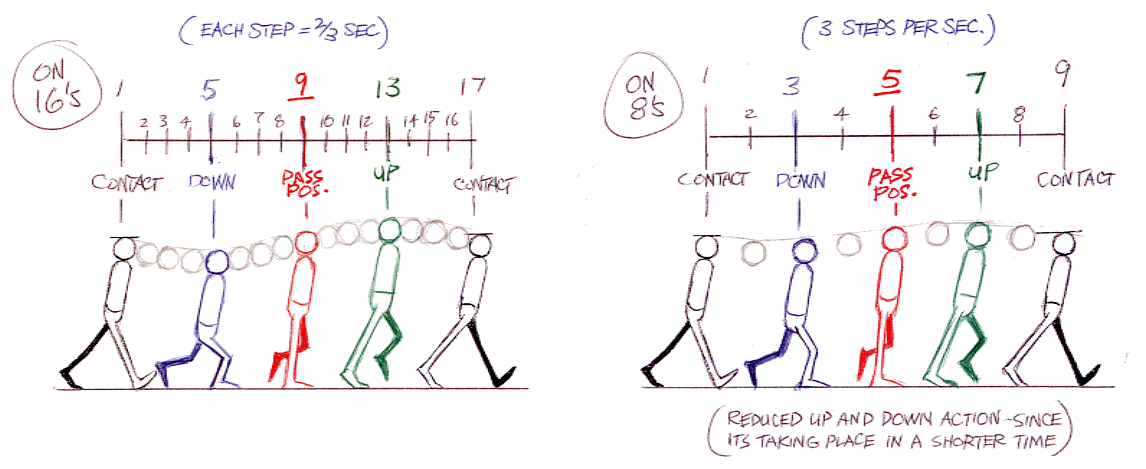
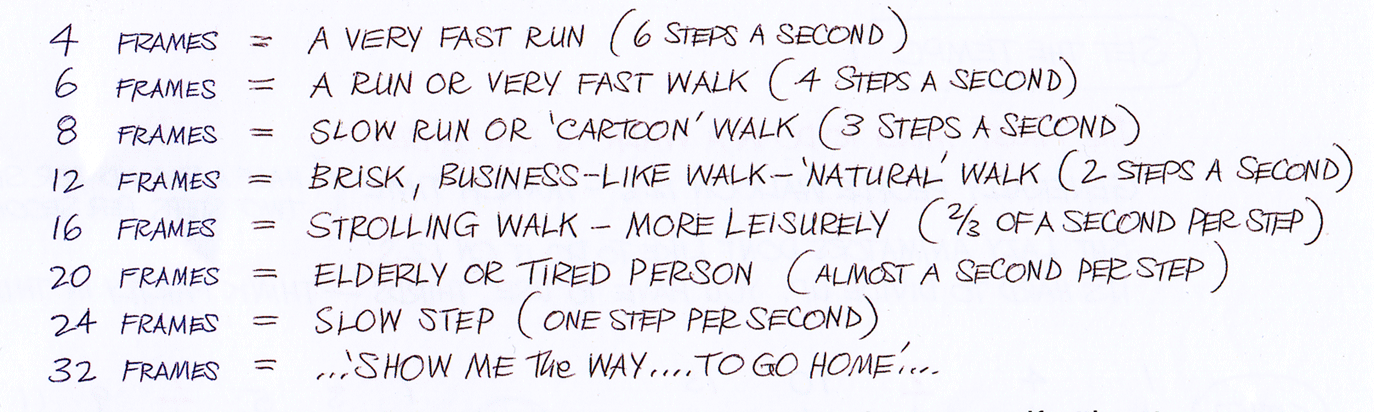
- Most people walk in march time (2 steps per second). However, animators prefer to set the timing in 16's or 8's because it is easier to divide up. [Example]
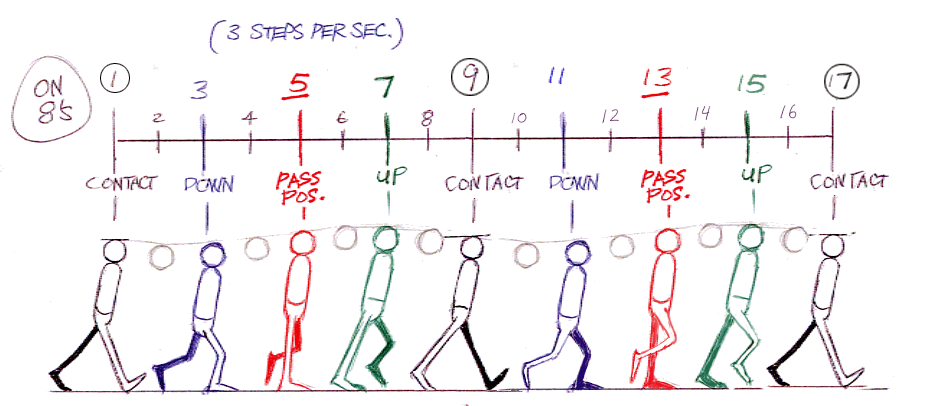
- Eight's (8's) is equal to 3 steps per second. One step is covered from frame 1 to frame 9.
- Sixteenth's (16's) is equal to 2/3 of a second per step. One step is covered from frame 1 to frame 17.
- Examples timings
- Timing Chart for a walk.
- Types of Walks - Characters - Acting
- Experiment - Walk Cycle Part 1: LEGS (2 1/2
hours)
- Overview: We will create a basic figure and animate him/her taking two steps. Keep in mind we will be animating on 8's. That's fairly fast walk, so the stride and up & down action should be relatively short. We will use a grid to place accurately place the feet.
Today will will only create the movement of the legs. Our character will just be taking two steps, but we can easily create a cycle with the 16 drawings we make. Next week we will add the shoulders, arms and hands and refine the feet. - Basic Figure Construction: Create your figure using only the basic components necessary for the lower half of the walk. Include the head, torso, pelvis, legs and feet. Leave the arms and shoulders out for now. For a really simple figure use lines and circles to create joints and the main components. Draw your figure in profile view. [Example]
- Open this Template or set properties as below:
- 550x400, 24fps
- Create two layers: roughs and guide
- Create guides and action paths on the guide layer. [Example]
- Extend the exposure to frame 17. Frame 1 and 17 will be the same drawing.
- Guides and Resources:
- Add this timing chart to your Guide layer for reference. For this exercise we will make the action a constant speed. The inbetweens will be evenly spaced.
- Note the following:
- Contact Positions on frames 1, 9, and 17.
- Passing Position on frames 5 and 13.
- Down Position on frames 3 and 11.
- Up Position on frames 7 and 15.
- Inbetweens on frames 2, 4, 6, 8, 10, 12, 14, and 16
- Use the Guides provided to keep your drawings accurate
- ground line
- top of head line
- pelvis line
- Path of action for the foot and head
- Use this guide to draw your walk positions. NOTE: these drawings are spread out to show the four main positions for frames 1-9. Frames 10-16 are exactly the same only the front foot is lifted. Your actual drawings will overlap like this and should include inbetweens on frames 2, 4, 6, 8, 10, 12, 14, and 16.
- Use this guide for the action of the foot.
- Create your Key (Contact Position) drawings
- Turn on onion skinning.
- Set it to Next Two and Previous Two Drawings.
- On frame 1 of your roughs layer, draw the first Contact drawing.
- Select frame 9 create the next Contact drawing for the opposite leg.
- Frame 1 and 17 will be the same drawing.
- Create your Breakdown (Passing Position) drawings
- The drawing that appears halfway between two key drawings is called the breakdown drawing. Create the breakdown drawing on frames 5 and 13.
- Create your main In-Betweens (Up and Down) drawings
- The Down positions should be on frames 3 and 11.
- The Up positions should be on frames 7 and 15.
- Create the rest of your inbetween drawings
- Inbetweens on frames 2, 4, 6, 8, 10, 12, 14, and 16 are evenly spaced between the previous and next drawings, however, the action of the foot is delayed on first few frames. Refer to this guide.
- Overview: We will create a basic figure and animate him/her taking two steps. Keep in mind we will be animating on 8's. That's fairly fast walk, so the stride and up & down action should be relatively short. We will use a grid to place accurately place the feet.
Please have the following prepared for the next class:
- Finish Part 1 of the Walk experiment
- We will work on the arms swing next class.
*Some images and video from Animators Survival Kit, Toon Institute and Brian Lemay