2D Animation: AD540
COURSE CALENDAR | WEEK 13 CLASS OUTLINE | Homework
Topics Covered in Class:
- Setting up your Final Animated Sequence
- Set the Document Settings to 720px x 540 px, 24 fps
- Create new graphic symbol for each animated action and build your action inside that symbol.
- If you have already created or imported your drawings to your action symbols, it will be helpful to put each moving element is on it's own unique, appropriately named layer.
- When drawing frame-by-frame animation create roughs first to get the initial action down. Then go back and refine your drawings, adding secondary actions, then detail and color.
- When you have completed each animated action you can bring your action symbols to the main stage to create camera moves with backgrounds and props.
- Choosing an Approach: You have two options for animating in Flash.
- Frame-by-frame animation: This approach will be the same as traditional animation wherein you will change or redraw your character on each frame or every two frames. You will be drawing with the brush tool in Flash or importing and editing drawings created or traced in Illustrator. This method is preferred.
- Frame-by-frame and puppet-style motion tweening: The first part of this approach is a "puppet-style" animation process wherein your will create symbols out of each of part of your character, move your character part-by-part, and often use motion tween to create the illusion of motion. In many instances you will also need to use traditional frame-by-frame animation, especially for more complicated actions. You may create your drawings in Illustrator and import them to Flash or draw directly in Flash.
- If you will be animating using the "puppet-style", one option is to import your character to the stage, select each part of your character and create and name symbols (f8) for each moving element. Then select all the symbols, right-click over your character and choose convert to symbol- named after the action. Then with the character still selected choose Distribute to Layers. Flash will create layers, based on your named symbols. For each moving part, adjust the pivot point (the circle) while in Transform mode (Q).
For example: the pivot point for the upper arm would be located at the top where the arm meets the shoulder.
Review these two tutorials for Character Animating in Flash using puppet style: - Both options will follow the same principles of animation. You will be required to consider the following:
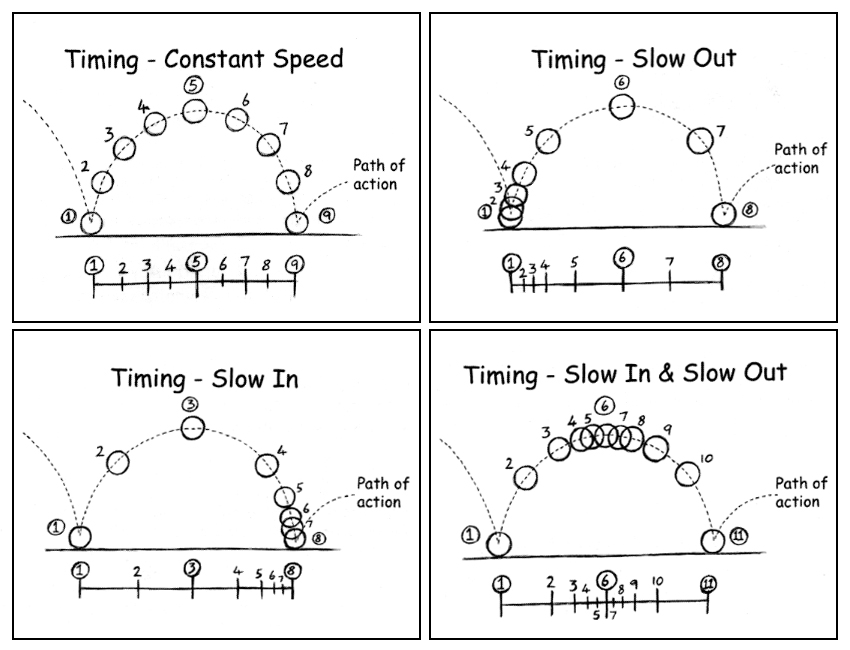
- timing charts for each action
- the path of action
- key frames and breakdown drawings before drawing inbetweens
- squash and stretch
- overlapping action and drag
- recoil, anticipation, follow-through, and drag
- REVIEW Weeks 1-8 before beginning to work
- Learning Activity: Flash Techniques for Simple Translations (.5 hours)
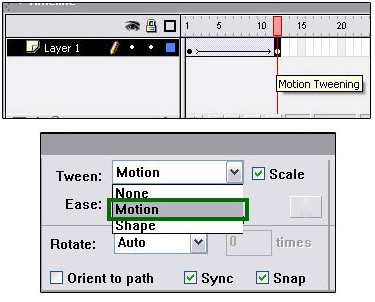
- Tweening:
- Tweening, short for in-betweening, can be set by selecting a frame between two keyframes and choosing Tween > Motion from the properties inspector.
- Use motion tweening when doing simple translations, rotations or shearing. To do complex character animation you will need to draw frame-by-frame.
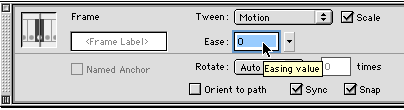
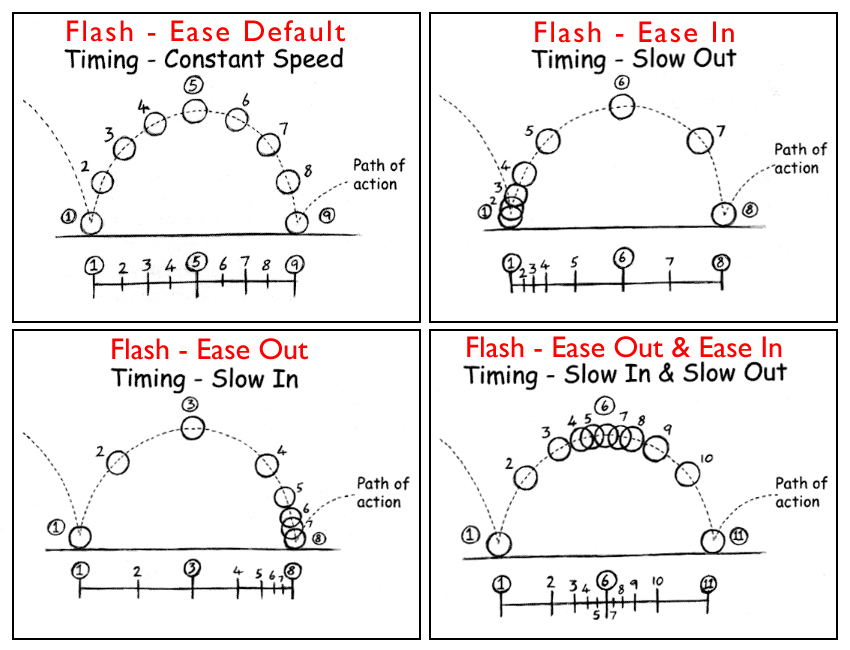
- Ease In & Ease Out vs. Slow in & Slow Out
- In week three we learned about the traditional animation technique called Slow in and Slow out.
- Flash uses a similar technique called is Ease in and Ease out. However, the two names are reversed.
- Ease In (easing into a motion) is the same as Slow Out (slowing out of a keyframe). Start out slow and pickup speed.
- Ease Out (easing out of a motion) is the same as Slow In (slowing into a keyframe). Start out fast and gradually slow to a stop.
- Use the Properties Panel to adjust the Ease for your keyframes.
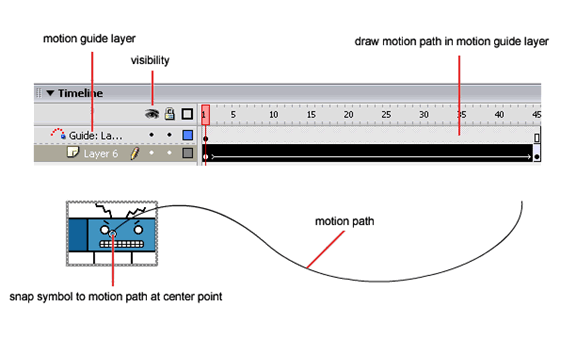
- Motion Guides
- For very simple translations in a scene, use motion guides to move your animated symbols or objects.
- Create a motion guide by selecting a motion-tweened element layer and choosing the motion guide button or right-clicking. A new Guide layer is created as a parent of the element layer. Use the pen, brush or pencil tool to draw a guide on the guide layer. Select the element with snap selected, to snap the element to the guide path at the start and end of the motion.
- Tweening:
- Learning Activity: Camera Moves in Flash
(.5 hours)
- Creating camera moves in Flash will sometimes require that you create a new graphic symbol that includes your background, objects, and main character actions. You can then create keyframes in your main timeline to animate the camera.
- Cut: One piece of animation is replaced by another on consecutive frames. The easiest way of creating cuts is by creating separate scenes. To create a new scene, choose Insert > Scene from the dropdown menu. Choose Window > Other Windows > Scene to bring up the Scene palette.
- Tracking Shot: The camera stays focused on the main character as it moves through the scene. This is done by leaving the character in the middle of the scene and moving the background and foreground around it.
- Truck Shot: The camera rolls next to the action. This is done by moving all of the elements in a scene sideways.
- Pan
- Horizontal Pan: The camera stays in one place, but rotates to the left or right.
- Tilt Shot or Vertical pan: The camera stays in one place, but rotates up or down.
- Panning Perspective: In a long pan it is necessary to create pre-distorted objects or backgrounds to fool the eye into seeing the changing perspective.
- Inter-Cut and Cross-Cut: Involves jumping back and forth between actions happening in two different places, but that together make up the scene. This is done by building each half of the scene as its own symbol and using keyframes to show and hide actions as called for.
FINAL PROJECT is DUE in TWO WEEKS!!!
- See the Final Project description for requirements and assessment rubric.
*Some images and video may be adapted from Animators Survival Kit, Toon Institute, Tom Bancroft, Brian Lemay, Flash 5 Cartooning, Chris Georgenes, and Cartoon Solutions.