2D Animation: AD540
COURSE CALENDAR | WEEK 12 CLASS OUTLINE | Homework
Topics Covered in Class:
- Breaking Down Sound
- Bar Charts are used to analyze and record the various sounds and dialog used in an animation. The bar chart lets the director/editor accurately match sounds to specific synchronized frames in the animation. [sample]
- Dialog to be synched needs to be broken down very carefully in order for it to work successfully, whereas music or effects may need only a rough indication. In either case, you need to establish where the sounds start and end and mark this on your bar chart. When breaking down dialog, you will need to find the start point of each sound/word within the dialog and mark these on your bar chart. Words are identified on the bar chart using the phonetic sounds of a word, not the actually spelling.
- Here is an example of a bit of dialog charted on a bar chart.
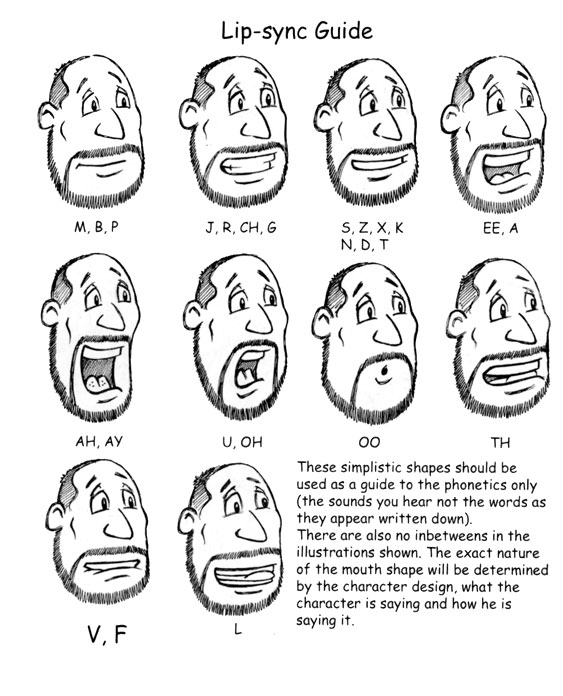
- Mouth shapes for lip-synching
- There are between 7 to 10 different mouth positions needed for the complete phonetic range of sounds in the English language.
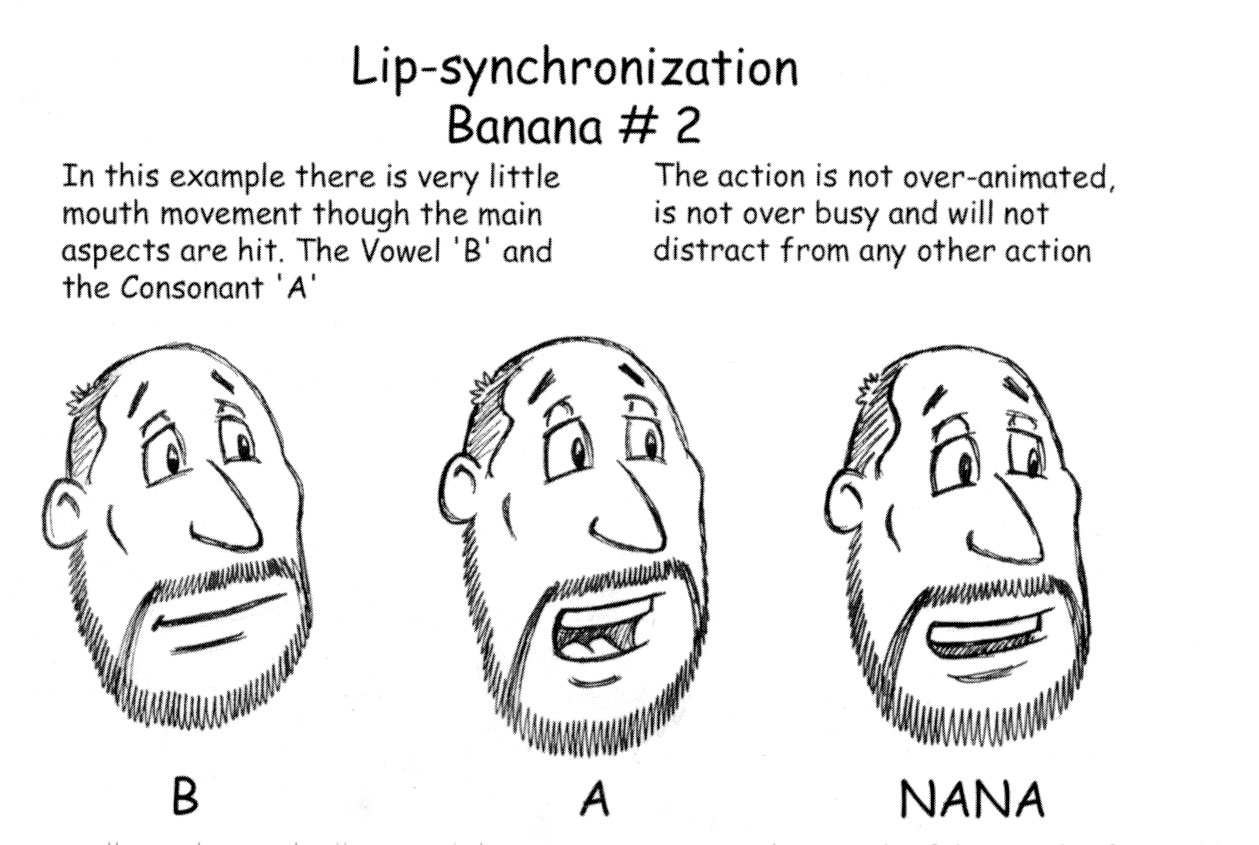
- We don't need to identify each and every sound in a word or phrase. Doing so can create very busy, over-animated mouth action. There are instances when you may have to "illustrate" the sound for a few frames longer. And, you may often need to place the mouth shape before the sound is actually heard. A scream, for example, may occur up to eight or ten frames early.
- This is an example for the word: BANANA
- Other references:
- There are between 7 to 10 different mouth positions needed for the complete phonetic range of sounds in the English language.
- Learning Activity: Creating lip-sync in Flash (1 hours)
- Getting Set Up:
- Open the tutorial file distributed in class. Double click on the head and notice how the head symbol has several different mouth positions in its timeline.
- This method involves putting all of the mouth positions for one character inside one symbol. Usually this is the head symbol. Each mouth position is laid out sequentially, frame by frame, next to each other. In this example, frames 1-7 have seven basic mouth positions. The additional series of frames show modified expressions using the eyebrows.
- When this head symbol is placed on the stage, you might notice that all of the mouths are constantly running in a loop when you view your movie. This is because the default setting in Flash sets symbols properties to "Loop". Click on the head symbol so that it's properties are active in the property box.
- Then, from the drop down menu, choose "Single Frame" instead of
"Loop". In the box to the right you will notice that it will say "First: 1". This
means that the symbol is no longer looping through all of the keyframes
within the symbol, but has stopped on frame 1. - You can control which keyframe and thus which mouth position is being shown at any given time. Refer to the mouth position guide which indicates on what keyframes each mouth position is located.
- Grab the playhead and drag it along to hear the sound file. Don't hear anything. That's because the default setting for imported sound in Flash is "Event". Select the sound file in the timeline and in the property box change the setting from "Event" to "Stream". Now try it.
- Creating a Bar Chart:
- Create a new layer in the time line and call it bar chart. We will create a bar chart in the Flash Timeline using labels. Alternately, you can use the paper bar chart handout.
- In the timeline, scrub to find where the first word starts and enter a blank keyframe. Go down to the property box, and in the input field "Frame Label", type the first word. This text will now appear above the sound layer in the timeline, letting you know what word starts at what point in the file. Try to spell the words as they sound rather than using their correct spelling. This helps you to know which mouth shape to use.
- Lock your bar chart (and all other layers except head) when finished.
- Synching the Sound:
- Using your barchart as a guide, in timeline create a new keyframe (F6) in the head layer where the first sound is heard.
- Click on the head symbol to make it active in the property box, and then type in
the number of the keyframe you want to display in the box. Use the mouth position chart with corresponding frame numbers as a guide. - We actually want the mouth position to happen one frame before the sound occurs to make it look more realistic. So, move the keyframe back one frame for each sound.
- Repeat this process for the rest of the dialog.
- Go back and use the modified expressions (see frames 10-17 and 20-17 inside the head symbol) to enhance the dialog delivery.
- Additional Resources:
Frame 1: M,B and P (Closed mouth)
Frame 2: AH (Open mouth)
Frame 3: EEE, or EH
Frame 4: CONSONANTS (example: R, D, N, S etc)
Frame 5: OH, W
Frame 6: TH, L
Frame 7: F, V- Read the tutorial PDF to learn more about the "mouth comp" technique
- Watch the free video tutorial from Cartoon Solutions.
- Use this guide to create a bar chart in the Flash Timeline using labels with this guide.
- Getting Set Up:
- Learning Activity: Creating Lipsynched Animation for Your Character (1.5 hours)
- Create Mouth Positions for your Character
- Create a new flash file: 720px x 540 px, 24 fps
- Import or draw your character in Flash and remove the head from the rest of the body.
- Create 7 mouth positions for your own character.
- Separate the eyes, mouth and any other movable part, from the head and create unique symbols out of each, including the head*. Do this by selecting the part and choosing Convert to Symbol, selecting Graphic and giving each a name.
- Remove all the symbols you just created from the stage. Now create a new symbol named head_all. Create the following layers in this order: jaw, headbase, mouth, pupils, eyeblink, brows.
- Create a keyframe on first frame of each layer and drag each symbol from the library to the stage, selecting the appropriate keyframe each time.
- Eyeblink Movieclip
- To prepare the eyeblink, fill in the eye area on the head_base with white. Make sure there is no white the eye_base and eyeblink1 so the pupils will show through. Use the skin tone around the eye to hide the white area on the head_base when assembled.
- To make an eyeblink, create a Movieclip symbol called eyeblink. Drag the eye_base symbol inside and extend the frames to 30. At frame 7 insert a keyframe. At frame 4 insert another keyframe and select the symbol on the stage. In the property panel choose swap symbol and choose eye_blink1. Insert another keyframe on frame 6. Insert a keyframe on frame 5 and swap symbol with eye_blink2.
- Sync to Dialog:
- Using your character's mouth positions, sync to one of the sounds provided or record your own. Use the mouth comp technique above. Be sure to include an eyeblink to give your character extra life.
- Whether or not you include lipsynched dialog in your final animated sequence or not, this will be required for the final project.
- Create Mouth Positions for your Character
Have the following prepared for the next class:
- Finish Lips exercise and create mouth positions for your own character
- Work on your final project (THREE WEEKS LEFT!!)
- Review these tutorials for Character Animating in Flash:
*Some images and video may be from Animators Survival Kit, Toon Institute, Tom Bancroft, Brian Lemay and Cartoon Solutions.